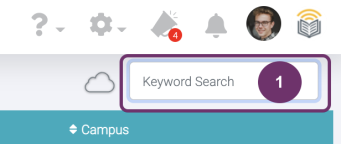
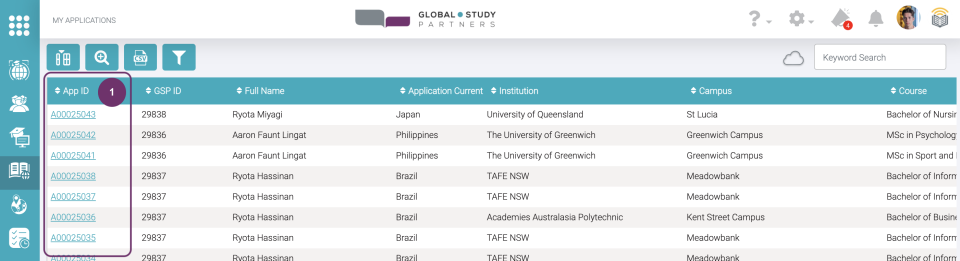
Keyword Search is used to search for an Application by typing Application detail in the Keyword Search textfield. You can search any of the following details:
Application ID
Student Full Name
Student ID/ GSP ID
Student Date of Birth
There is a special format when searching for ‘Student Date of Birth. The format you should use is yyyy-mm-dd (e.g., 1987-09-21). Any part of the details above are searchable.
2
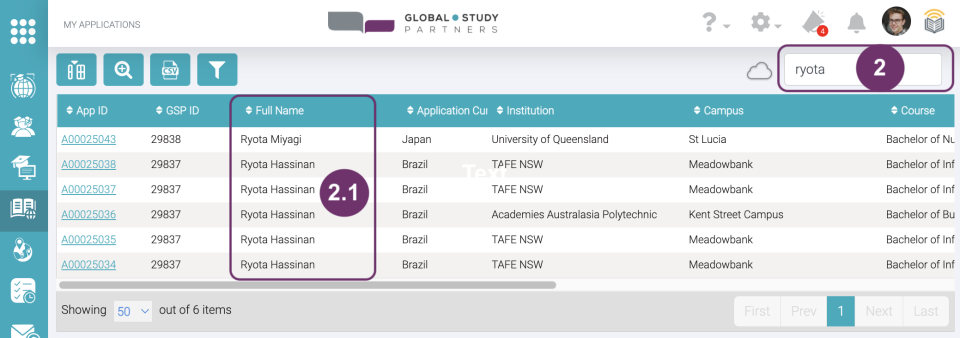
Example 1: You are looking for applications of a student named ‘Ryota Hassanan’. When you type ‘Ryota’, the function will search any part of the details bulleted in #1 and will display the following possible results based on the record of students you are allowed to access:
Ryota Hassanan
Ryota Miyagi
2.1 This means, any part of the student details that is searchable using he keyword is filtered and displayed
Example 2:
You are looking for applications owned by a student whose birthyear is ‘1980’. When you type 1980, and it so happen that there is a Student whose GSP ID is ‘198023’ and there is another student whose full name is ‘Ariel1980 Disney’. Then, the table will filter and display the following possible results:
Students whose GSP ID has 1980 in it (e.g., 19801, 19802)
Students whose full name has 1980 in it (e.g., Ariel1980 Disney)
Students whose birthyear is 1980 (09-Jun-1980)
2
3
To easily remove the keyword search instead of pressing backspace, click the cross button at the right of the the text field.
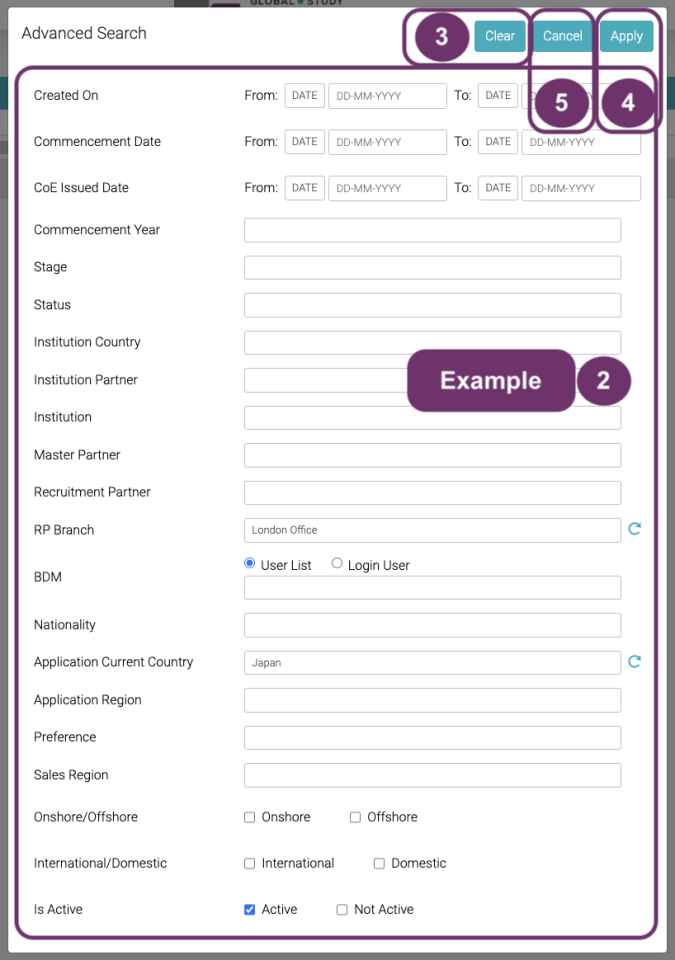
Advanced Search is used to search for an Application by typing Application details. The difference with Keyword Search is that you can identify what specific fields you want GSP App to search in. Click the magnifying glass icon with ‘+’ to show the pop-up screen of Application details that you can search for.
2
In Advanced Search, you can search the following Application details simultaneously:
Create On (From and To)
Commencement Date (From and To)
CoE Issued Date (From and To)
Commencement Year
Stage
Status
Institution Country
Institution Partner
Institution
Master Partner
Recruitment Partner
RP Branch
BDM
Nationality
Application Current Country
Application Region
Preference
Sales Region
Onshore/Offshore
International/Domestic
Active/Inactive
You can just fill-out the fields you need. You don’t have to answer all the fields. This is also useful in case you do not remember all the details you are searching for because there is search list function per field based on your keyword input.
Example: You want to see all active and enrolled applications owned by students who are in Japan at the time of application and were recruited in London Office
Application Current Country: Japan
RP Branch
Enrolment: Active (because the tickbox is checked)
By default, the tickbox for ‘Active’ field is checked which means it is searching for active applications only. You can change this but checking/ unchecking tickboxes of Active and Inactive.
2
3
To easily remove the keyword search instead of pressing backspace, click the cross button at the right of the the text field.
4
Click ‘Apply’ when you are satisfied with your inputs/ criteria of your search.
In case you clicked the ‘Clear’ button, you have then to click ‘Apply’ to remove any search criteria you might have previously applied.
4
5
Click ‘Cancel’ when you do not want to apply the changes in the criteria that you filled-out.
6
You will see the number of search results at the bottom of the applications list. In the example below, based on the search criteria there is only one application match.
6
Lesson 1 Find Application | Session 3 Sorting
1
The list is by default sorted by Enrolment ID in descending order. Sorting is only one field at a time. If you sort one field, then all the records related to it (the whole row) will follow. And if you try to sort another field, the previous sort order will be lost.
Click the up and down arrow on the left of each field/ column names if you want to sort a specific field.
2
At your first click, it will sort the column in ascending order (from earliest to latest ). Ascending order is any of the following:
from the earliest date to
the latest date
from A to Z
from 0 to 9
The arrow will be changed into an upward arrow and of a blue color.
2
3
Click the upward arrow again to sort the column in descending order (from latest to earliest). Descending order is any of the following:
from the latest date to
the earliest date
from Z to A
from 9 to 0
The arrow will be changed into a downward arrow and still a blue color.
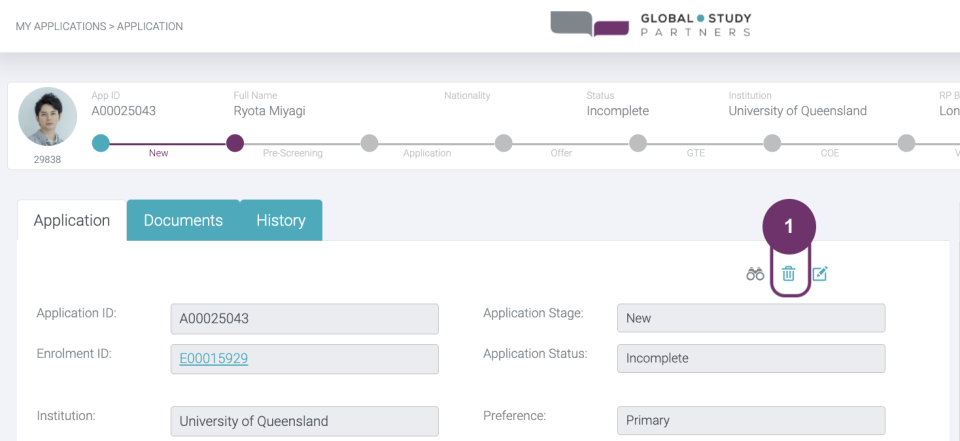
The bar above the Application details gives an illustration of all the stages that the application has to go through. Through this, it is easier to identify the current stage of the Application which is the purple dot. If the color of the dot is teal, this means that the stage has already been done. Image below tells that the application’s stage is New going to Pre-Screening.
2
By seeing the profile picture, you can immediately determine who owns the Application.
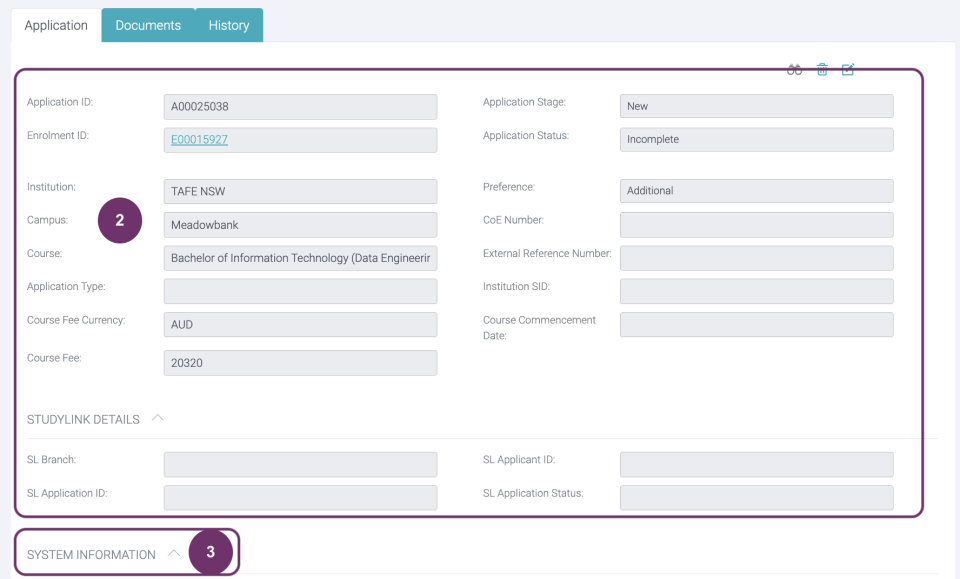
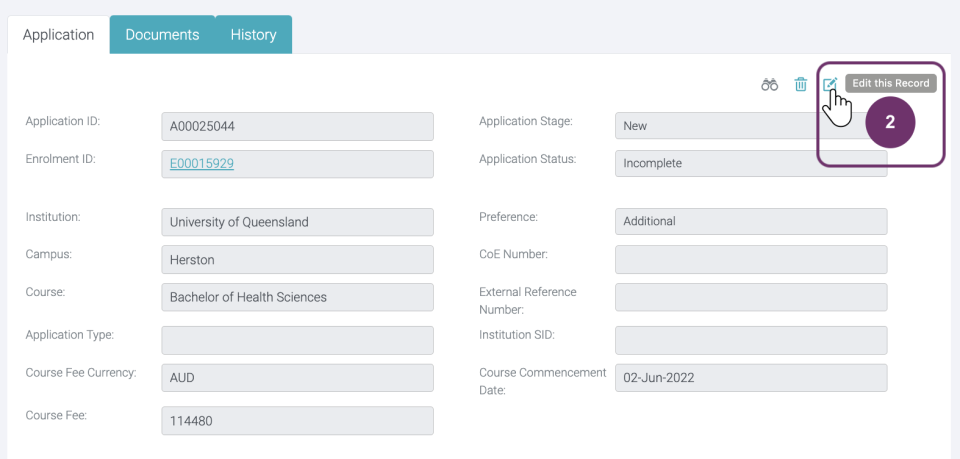
You can view Application details by clicking the App ID in the Applications List. Click the App ID to view the application details.
2
You shall find the following details under Applications:
Application ID
Enrolment ID
Institution
Campus
Course
Application Type
Course Fee Currency
Course Fee
Application Stage
Application Status
Course Fee Currency
External References Number
External Reference Number
Institution SID
Course Commencement Date
For Application Type field, below is the description of each type:
Unique – if student wish to study one course only in this enrolment.
Package Start – if student wish to study for more than 1 course in a packaged enrolment. Choose this type if the Application is to be taken first among the rest of the package courses.
Package Progress – if student wish to study for more than 2 courses in an enrolment package. Choose this type if the Application is to be taken among the first course and last course in this packaged enrolment.
Package End – if student wish to study for more than 1 course in a packaged enrolment. Choose this type if the Application is to be taken last among the rest of the package courses.
Pathway – Choose this type if student is applying for 1 course in this enrolment. And there is a plan to proceed to further study after the completion of this package enrolment.
None – if none of the above seems fit the application type
You may also have noticed some of the Student details on the right side which you may find helpful.
StudyLink details to be filled out by GSP Admin. Kindly coordinate with GSP Admin/ Branch Head or Company Head if the student has applied for this or needs this.
The tabs you can access is also determined by your permission role. For the particular permission role we have in the screenshot below is Branch Standard.
2
3
Click the label ‘SYSTEM INFORMATION’ or any part of the label’s row to expand or collapse this section and view the details. All the fields here are system generated. Therefore, you cannot edit any of the fields here. These are the following:
Created By – User who created the Application record
Created On – When was the Application record created
Last Modified By – The last user who made changes to any of the Application details (details above System Information)
Last Modified On – When was the last change made
Active – Tickbox is checked if the application record is active and it is unchecked if not.
If Last Modified By and Last Status Updated were blank, then there were no updates made yet for the record.
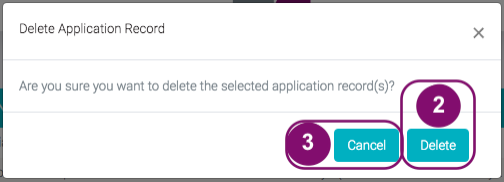
Delete function is important especially when you have duplicate records. Click the trashcan icon above the application record.
2
By seeing the profile picture, you can immediately determine who owns the Application.
2
3
Click ‘Cancel’ if you do not want to delete the Application record anymore.
4
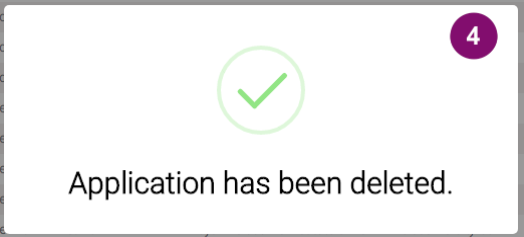
Another pop will be displayed to confirm that you have successfully deleted an application. This pop will display only until 5 seconds.
4
4.1 May also appear if the Application you were trying to delete has an active commission. Therefore, you won’t be able to delete this. Only GSP Admin has the permission to update commission status.
The panel on the right side, show some student details who owns the Application. This helps, so Agent is always guided to whom the application is for and validated by supporting details. Student details you will find here are the following:
Date of Birth
Nationality
Student Email
Home Phone
Mobile Phone
Skype ID
I have Worked After My Studies
Professional Membership
Start of Employment
End of Employment
You cannot edit any student details here as this is only meant for reference.
When you set a record page to “Watching”, you will receive notification whenever updates are made into the record by:
Notification in the header (bell icon)
Via email according to your set up in the Email Settings page in My Profile
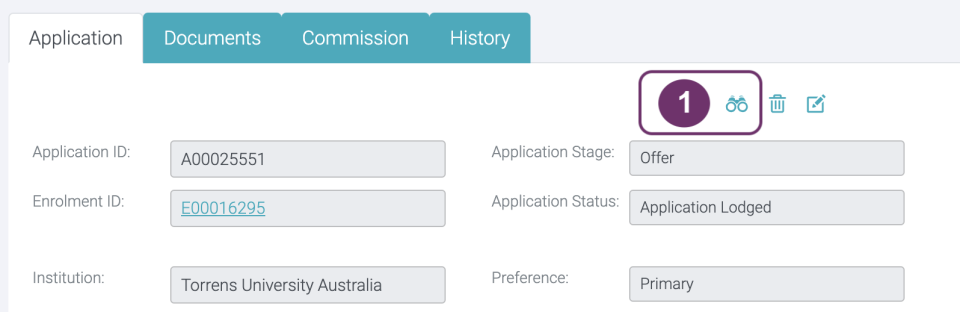
Click Watch (binoculars icon) to see who else are watching this record and if you want to change the setting from “Watching” to “Not Watched”
When Watch is colored, it means you are currently watching updates in the record already.
2
Clicking Watch will display:
list of people watching the same record
action button where you can change watch settings, either you want to watch it or stop watching
In the image below clicking “Stop watching this record” will turn the watch icon into grey color. This means you will no longer receive any notifications when an update has made to this record.
Go to an Enrolment Record where you want to create an Application by clicking the student’s profile picture from the Enrolment list. Let’s say that the institution of this Enrolment is under University of Queensland.
2
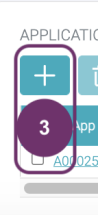
Scroll down the Enrolment Record. You will see Applications List.
2
3
At the top of the list of applications, click the ‘+’ button. This is the Create Application button.
4
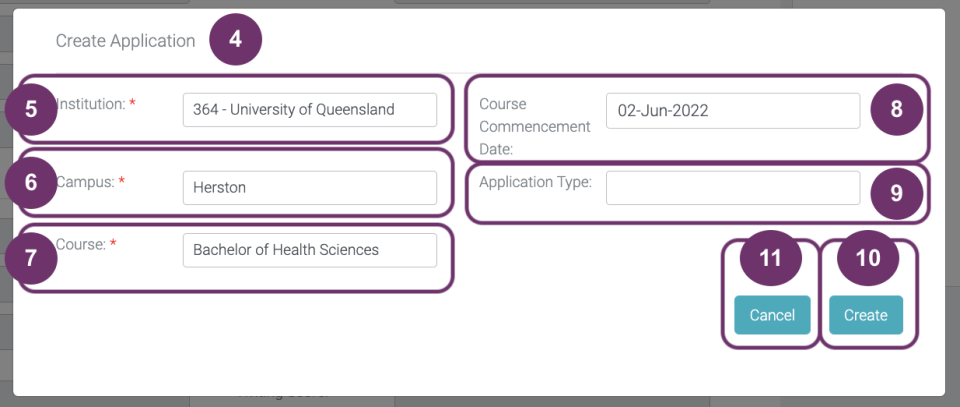
Create Application pop-up form will be displayed so you can fill out the details. Fields with red asterisks (*) are mandatory fields. The application will not be created unless you fill them out.
4
5
Institution – This is auto-populated. This is based on the institution of the Enrolment to which the application you are creating for. In this case it is ‘University of Queensland’. Even this is auto-populated, you can still change this.
There might be times that the institution name is long and the drop down box is limited, you won’t be able to see the complete institution name in the box when selected. However, you can check by clicking the dropdown box.
6
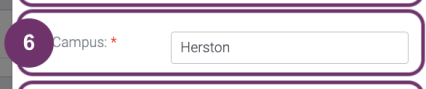
Campus – Some institutions have multiple campuses. You have to specify in this field which campus will the application be addressed to. The only campuses listed here are the campuses of the selected institution. Also, if the selected institution has only one campus, then you will only find one campus in the drop down box for you to select.
6
7
Course – Click this field to see all available courses under the selected campus. Click one of the courses in the list and proceed to the next field.
8
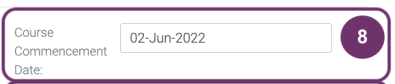
Course Commencement Date – This field does not follow the commencement date as displayed in the course details page. Thus, you are given the flexibility to select the commencement date to make sure that this is correct and updated.
8
9
Application Type – You can select among the picklist:
Unique – if student wish to study one course only in this enrolment. Package Start – if student wish to study for more than 1 course in a packaged enrolment. Choose this type if the Application is to be taken first among the rest of the package courses. Package Progress – if student wish to study for more than 2 courses in an enrolment package. Choose this type if the Application is to be taken among the first course and last course in this packaged enrolment. Package End – if student wish to study for more than 1 course in a packaged enrolment. Choose this type if the Application is to be taken last among the rest of the package courses. Pathway – Choose this type if student is applying for 1 course in this enrolment. And there is a plan to proceed to further study after the completion of this package enrolment.
10
Course Commencement Date – This field does not follow the commencement date as displayed in the course details page. Thus, you are given the flexibility to select the commencement date to make sure that this is correct and updated.
10
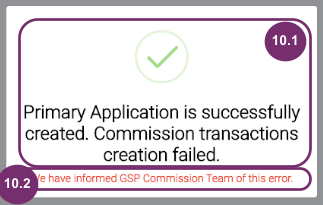
10.1 You will be immediately notified that the application record has been successfully created and the creation of commission transaction has failed. This will disappear after 5 seconds. You will then be redirected to the record page of the Enrolment you just created.
10.2 ‘We have informed GSP Commission Team of this error.’
There are certain criteria that need to be fulfilled that’s why this was displayed. Hence, our GSP Commission Team will be automatically notified about this and will take certain actions to make sure that the commission is accounted correctly.
To further explain this error…
We have this concept of ‘The Preference System’. Applications have a field called, ‘Preference’. Preference can be either ‘Primary’ or ‘Additional’. The ‘Preference’ is based on the Level of Study to which the Application is linked to. It works in such a way that there should only be one ‘Primary’ Application per ‘Level of Study’ under a specific Enrolment. The ‘Preference’ of Applications under the same Enrolment are automatically determined by the following criteria:
An Application’s ‘Preference’ is set to ‘Primary’ if it is the first Application created with the ‘Level of Study’ An Application’s Preference’ is set to ‘Additional’ if it is NOT the first created Application with the ‘Level of Study’
In this concept, only ‘Primary’ Applications have auto-generated commission transactions and for some reasons, that transaction failed to create automatically. Thus, you received this error and at the backend we have an internal system that can catch these scenarios.
This has been applied to all levels of study except for ‘English’ and ‘English Language’. The following is a list of Level of Study to where this is applied:
Masters Degree (Coursework) Bachelor Degree Diploma Graduate Diploma Graduate Certificate Masters Degree Ph.D. Certificate III Masters Degree (Research) English Language Bachelor Degree with Honours Dual Degree Study Abroad Primary School Postgraduate Diploma Postgraduate Certificate Masters Degree (Taught and Research) Associate Degree Short Course / Professional Development Foundation for Undergraduate
Foundation for Postgraduate Diploma level 5 (Graduate) Diploma level 7 Certificate level 4 English Foundation Year 12 Certificate IV Advanced Diploma Certificate First-Professional Degree Combined Baccalaureate and Master’s Prog Professional Masters Degree Double Major Degree Juris Doctor Combined Graduate / Doctoral Degree Masters Degree (Taught) Certificate level 2 Certificate level 3 Combined Bachelor’s / Doctoral Degree
Postgraduate Qualifying Program Certificate II Secondary School (Graduate) Certificate level 7 Diploma level 6 Certificate level 5 Certificate level 1 Unilink Diploma Non Award Certificate I Advanced Certificate Higher Diploma Higher Certificate Undergraduate Diploma Undergraduate Certificate Undergraduate Masters Doctorate (Specialised) Year 11 Dual (Conjoint) Degree
Example 1 An Enrolment has an existing Application, Masters of Agriculture. Its Level of Study is ‘Masters Degree’ and its Preference is Primary. Then, you created an Application, Masters of Plant Science. Its Level of Study is ‘Masters Degree (Research)’. Since the Level of Study is different, the Preference of Masters of Plant Science is set to Primary upon creation and its commission transaction should be automatically generated.
Example 2 An Enrolment has an existing Application, BS Pharmacy. Its Level of Study is ‘Bachelor Degree’ and its Preference is Primary. Then, you created an Application, BS Medical Technology. Its Level of Study is also ‘Bachelor Degree’. Since the Level of Study is the same, the Preference of BS Medical Technology is set to ‘Additional’ upon creation and there should be NO commission transaction to be automatically generated.
10.3 Otherwise, this message will be displayed.
11
Click ‘Cancel’ button if you do not want to continue creating the application record.
Go to the Application record page by clicking the application ID from the application list
2
At this point, you are in a view page of application record. You cannot edit any as also visualised by the grey background of text fields. Click the edit icon button to make this view editable. Note that you can only edit application details when the Stage is New. If application stage had passed New, please ask for your BDM’s assistance should you have any updates.
2
3
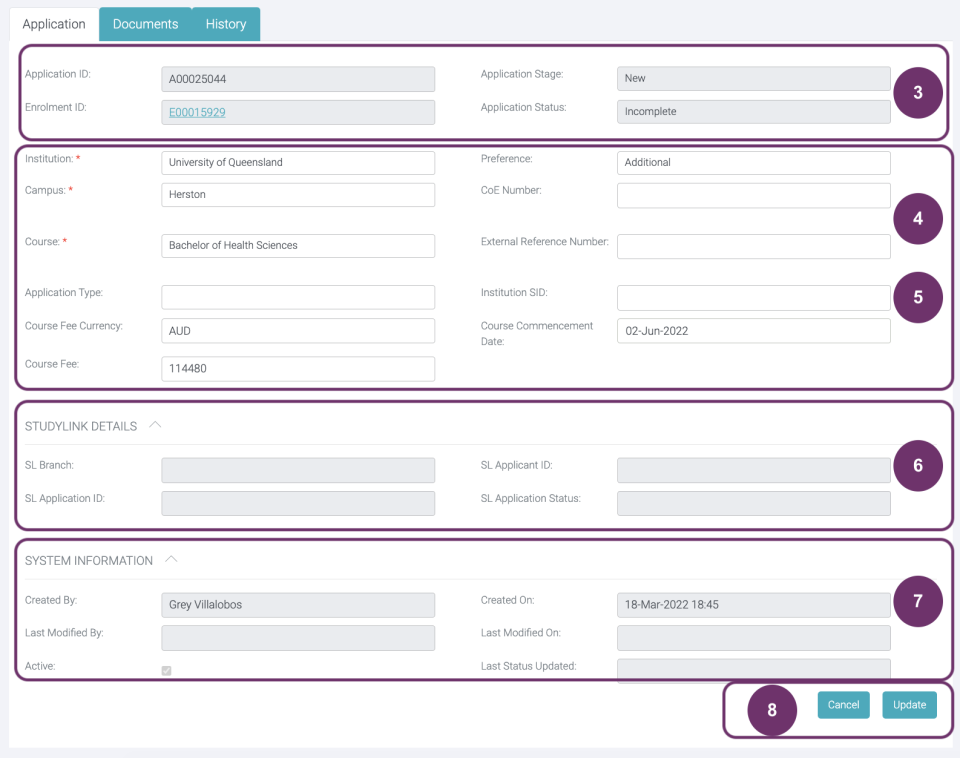
Now that the record page is in edit mode, you can edit application details that have white background. You cannot edit fields with grey background, which are the following:
Application ID – a unique number that is auto-generated and auto-assigned by GSP App when the application was created
Enrolment ID – the enrolment to which the application is under. You can click this to navigate to the enrolment record page
Application Stage – this follows the stage of the enrolment
Application Status – this is based on the application stage. Different Application stage have different set of application statuses.
4
You will find here the fields that you already filled out when you created this application. In any situation that you need to update any of these, you may do so. These fields are the following:
Institution
Campus
Course
Course Commencement Date
Application Type
4
5
You may also have noticed that there are additional fields compared when you are creating an application record. To make sure that the application is properly handled, fill out the following fields as necessary:
Application Status – When the stage is new, the only choice for this is ‘Incomplete’.
Course Fee Currency – This follows the currency of the country that the institution destination is using
Course Fee – This is pre-populated based on the displayed fee in the course details but can also be updated here. Updating this field will not affect the display in the course details.
Preference – Is the application the ‘Primary’ that the student would like to take or just an ‘Additional’
CoE Number – Confirmation of Enrolment number will only be issued by the institution
External Reference Number – Just in case there are other important reference number
Institution SID
All other fields that you find in page are to be updated by your BDM especially when the Stage had already passed ‘New’. Make sure to keep the BDM assigned to you updated on the progress.
6
StudyLink details to be filled out by GSP Admin. Kindly coordinate with GSP Admin/ Branch Head or Company Head if the student has applied for this or needs this.
6
7
Ignore the System Information as this is auto generated and is auto updated by the GSP App.
8
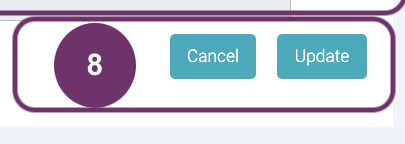
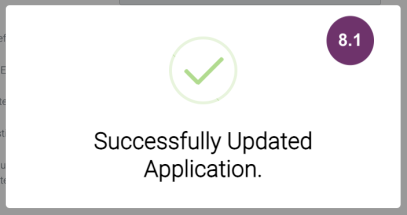
If you are happy with the input details, click ‘Update’ button.
Click ‘Cancel’ button if you do not want to save your changes. After clicking ‘Cancel’ button, the page will again turn into View mode wherein you cannot edit any detail.
8
8.1 You will be immediately notified that the application record has been successfully updated. This will be displayed for about 5 seconds only. You will then be redirected to the application record page you just updated.
Lesson 5 Export Application List | Session 1 Filter Columns
1
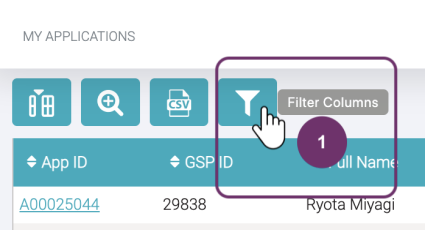
This function acts like a keyword search wherein it searches the list but on a columnar basis. It also acts like an advanced search because you can search data simultaneously. This function can be found together with the other function icons at the top left of the Application List. Click the funnel button to search by column.
2
After clicking the Filter Column icon button, textboxes below the field columns will be displayed some of which are disabled by being greyed out. These are disabled because they are the fields that are already found in the Advanced Search. Having them in two functions may cause confusion to users on the search results, so it’s better to disable these fields here.
Textboxes that appeared behave the same way as the Keyword Search. However, the Commencement Month is an exception in terms of input. Months have equivalents numbers which you will use to search. 1-12 represent Jan – Dec (e.g., 1 is Jan, 2 is Feb, 3 is Mar, and so on). Take into consideration too that it searches the parts of the month number.
Example You want to search for enrolments that will commence on January. You need to type ‘1’ in the text box. The search results would then be month numbers with ‘1’. Those months are January (1), October (10), November (11) and December (12). You can just use the sort function to make all January line up.
2
3
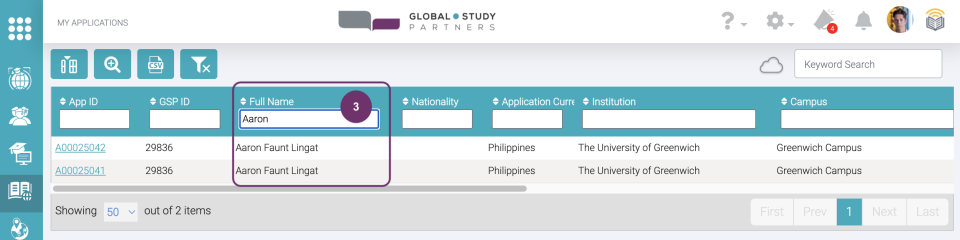
The simultaneous search is helpful especially when you can’t remember all the details of a column/ field. Let’s say you want to find all the applications related to Aaron Faunt Lingat. However, you can only remember ‘Aaron’. You can type ‘Aaron’ under ‘Full Name’ and the list will filter all applications related to students with the name of ‘Aaron’. You can also refine searches by typing details on other columns all of the same time.
4
For instance, you want to search for students who are in Brazil at the time of application and are applying in TAFE.
4
Lesson 5 Export Application List | Session 2 Show/Hide Columns
1
By default, the displayed columns are the following
App ID GSP ID Full Name Nationality Application Current Country Status Commencement Date
Institution Campus Course Preference Stage App Type Agency
However, if you want to see more/less/modify details in this table you can do so by clicking the Show/Hide Columns icon button.
1
2
When you click the Show/ Hide Columns icon button, a list of available fields with checkboxes is displayed. Checkboxes that are ticked means that they are already displayed in the Report View. Thus, by default the fields itemised in #1 are checked here.
3
Check the tickbox of the field that you want to display.
Image 3.1 Upon ticking the checkbox, the field will be immediately displayed in the application list.
3
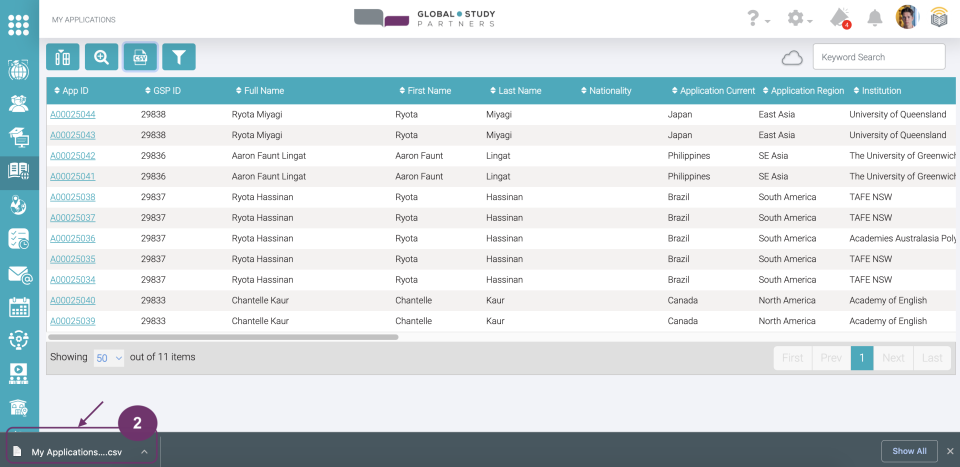
Lesson 5 Export Application List | Session 3 CSV Export
1
You can download the enrolment details in case you need to do some reports. You can download the full list or result of your searches. You can refine the full list by using any search function(s), namely:
Advanced Search
Keyword Search
Show/ Hide Columns
Basically, you can download all the data exactly the same as they are displayed in the Applications List.
The downloaded report will be in csv format. This format is a spreadsheet where you can create your report or copy paste in your preferred spreadsheet (e.g., Google Sheets, MS Excel)
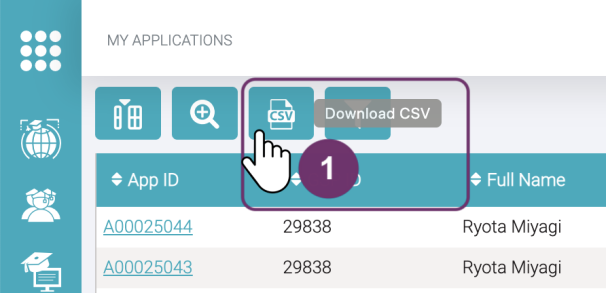
Click the CSV icon button to download the report. If you did not use any search function, the downloaded report will only include the active student records.
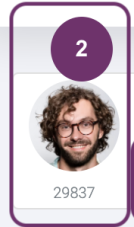
2
A report will be immediately downloaded upon clicking the CSV report icon. You can either find it below your browser’s window (2) and/ or in any of your folders (2.1).
2
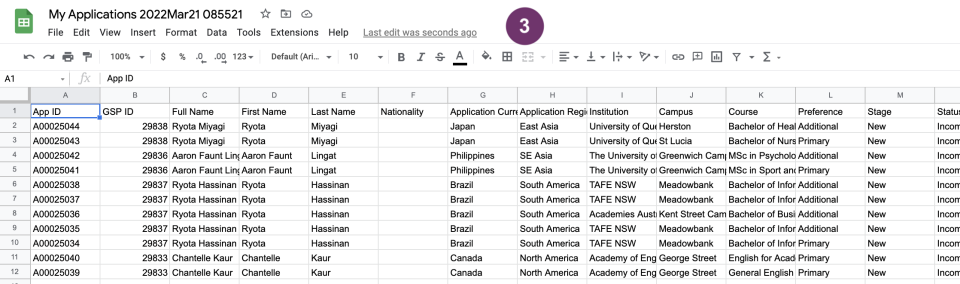
3
Open the file to view the details. The number of application records here should be the same as the number of records in the Report View when you made the export. The first row is the same as the column name in Report View and the details follow.