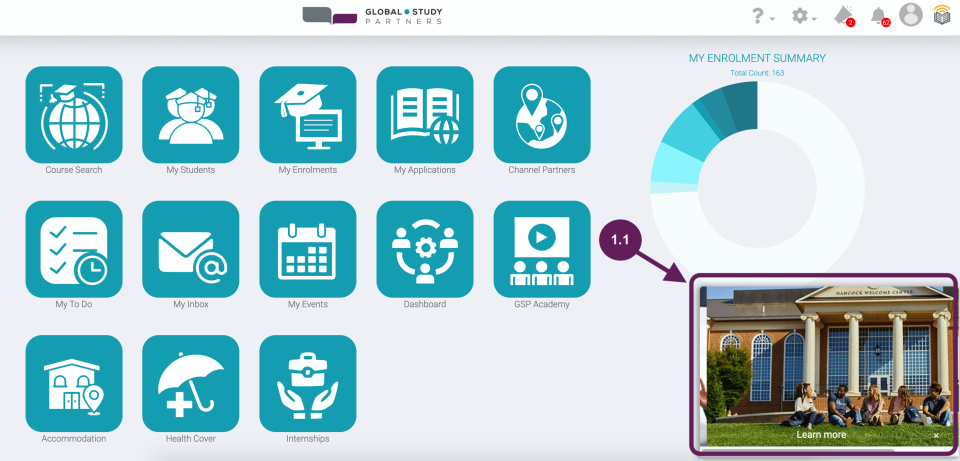
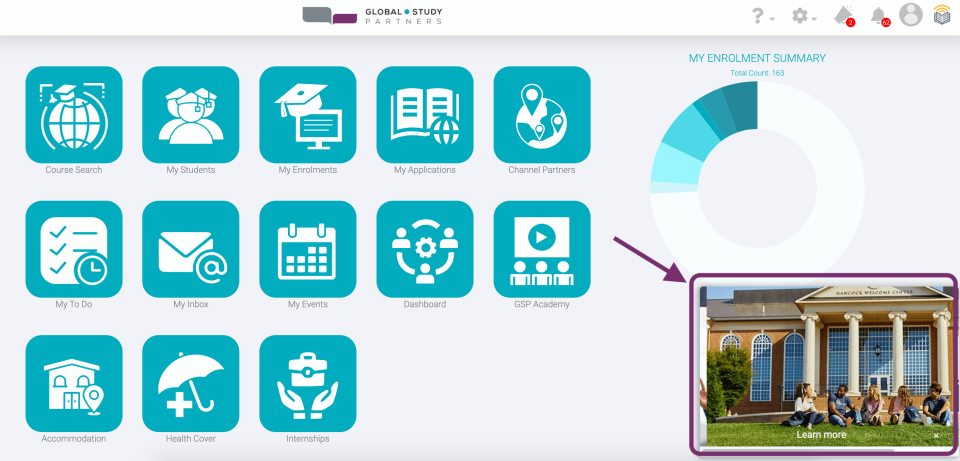
next

Course Search
Search courses based on what and where you would like to study
Lessons 1 - 5
Learning Objectives
- Navigate GSP App
- Key features in Main Menu
- Understand Enrolment Summary and Commission Summary
- View commission details and upload commission invoice
- Helpful tools found in the header menu
- Get help from specific GSP Teams
- Manage profile (profile picture, login credentials and settings)
- Logout
Overview
The very first page that you will see immediately after login is the ‘Homepage’. Homepage is composed of four parts, namely:
1. Header – This is the top bar you see in all GSP App Pages.
2. Main Menu – click any icon button to go to a particular page
3. My Enrolment Summary – Shows how your company or branch is doing based on the numbers and a doughnut graph at a glance.
4. Commission Summary – Shows the flow of the computed commissions.

1
Understanding Your Permission Role
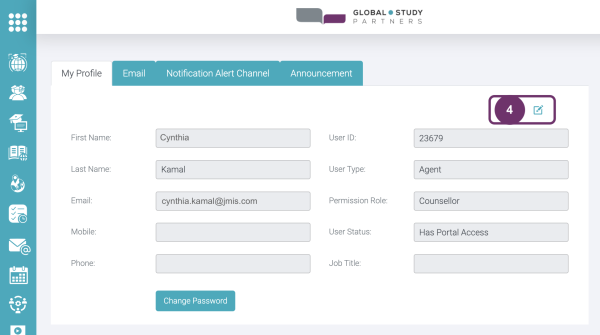
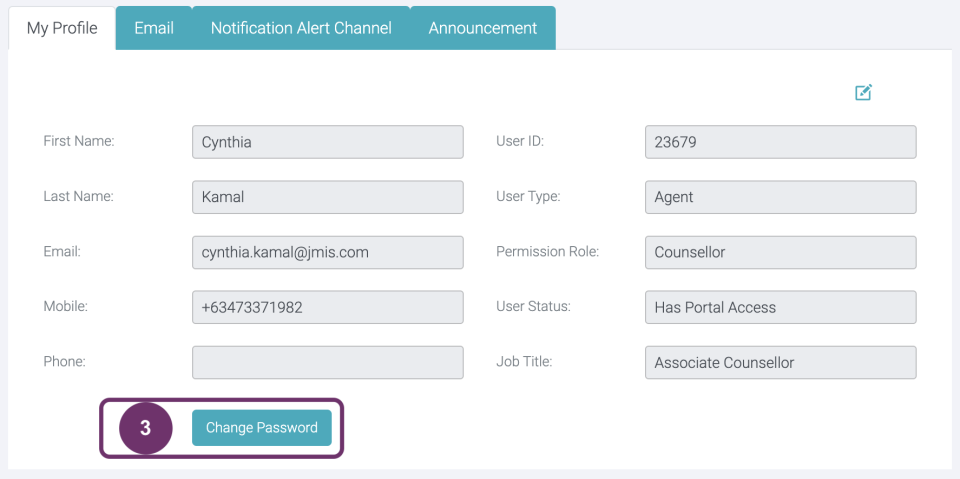
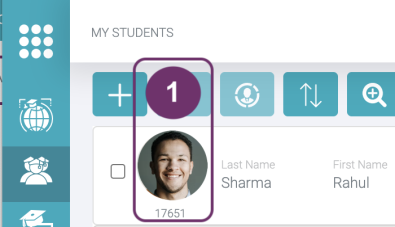
Before we dive in to details you have to understand first that different types of users in GSP App have different Permission Role/ level of access. You can identify your Permission Role by going to “My Profile”. Click your profile picture (if you have uploaded already). Then click “My Profile”.
If you have not uploaded your profile picture yet, you shall see this icon instead, Click this, and menu will appear. Click “My Profile”

2
You shall then be redirected to “My Profile” tab. This is your Permission Role.
This determines what features in GSP App you can access.
There are features that you can view but you cannot update the details in it. There are also features that you can do both, can view and update details. It differs per user depending on what Permission Role was granted to you. This can be based on your position in your company. So, if there are items discussed here that you do not see when you logged in. Then, it means that the Permission Role granted to you has limited access to some features.

2
1

The whole doughnut graph represents the count of enrolments within your Company, Branch or Yourself:
- If your Permission Role is Head Office Admin or Head Office Standard, the “Total Count” represents the count of Enrolments within your Company.
- If your Permission Role is Branch Admin or Branch Standard, the “Total Count” represents the count of Enrolments within your Branch only.
- If your Permission Role is Counsellor, the ‘Total Count’ represents the count of Enrolments directly under you.
Bear in mind also that Students may have multiple Enrolments. Also, Enrolments may have multiple Applications. Thus, the Enrolment count you see does not equate to count of students nor to count of Applications. In this example, there are 159 Enrolments alone.
To make this doughnut uncluttered and organised, Enrolment Stages/ Statuses are grouped accordingly. Each colored wedge (portion of the doughnut) represents a group. Do not be confused with the Enrolment Stages/ Statuses and Enrolment Group, they are different. Hovering your mouse pointer to each colored wedge will give you more details which will be explained next.
2
This wedge represents a group, “Enrolled“, as indicated in the middle of the doughnut graph. ‘Enrolled’ group is composed of the following Enrolment Stage only:
- Enrolled
Upon hover, you’ll also see that there are 9 Enrolments with Stage “Enrolled”. If you could also notice that that hovered wedge pops a bit.
Example:
Total count of Enrolments = 163
Total count of Enrolments with the following Enrolment Stage:
Enrolled = 9
Total count of Enrolments in Enrolled group = 9
Total percentage of Enrolled = 9/163 = 5.5% ~ 6%

2
Click the wedge, “Enrolled” to see all the Enrolments it is referring to.
2.1 Displaying all 9 Enrolments with Stage “Enrolled” as in the example above.

3

This wedge represents a group, “Enrolling“, as indicated in the middle of the doughnut graph. ‘Enrolling’ group is composed of the following Enrolment Stage only:
- Enrolling
Upon hover, you’ll also see that there are 5 Enrolments with Stage “Enrolled”. If you could also notice that that hovered wedge pops a bit.
Example:
Total count of Enrolments = 163
Total count of Enrolments with the following Enrolment Stage:
Enrolling = 5
Total count of Enrolments in Enrolling group = 5
Total percentage of Enrolling = 5/163 = 3.1% ~ 3%
Click the wedge, “Enrolling” to see all the Enrolments it is referring to.
3.1 Displaying all 5 Enrolments with Stage “Enrolling” as in the example above.

4
This wedge represents a group, “Visa“, as indicated in the middle of the doughnut graph. ‘Visa’ group is composed of the following Enrolment Stage only:
- Enrolled
Upon hover, you’ll also see that there are 2 Enrolments with Stage “Visa”. If you could also notice that that hovered wedge pops a bit.
Example:
Total count of Enrolments = 163
Total count of Enrolments with the following Enrolment Stage:
Enrolled = 2
Total count of Enrolments in Visa group = 2
Total percentage of Visa = 2/163 = 1.2% ~ 1%

4
Click the wedge, “Visa” to see all the Enrolments it is referring to.
4.1 Displaying all 2 Enrolments with Stage “Visa” as in the example above.

5

This wedge represents a group, “COE“, as indicated in the middle of the doughnut graph. ‘COE’ group is composed of the following Enrolment Stage only:
- GTE
- COE
Upon hover, you’ll also see the breakdown (in terms of count) of percentage besides ‘COE’. If you could also notice that that hovered wedge pops a bit.
Example:
Total count of Enrolments = 163
Total count of Enrolments with the following Enrolment Stage:
GTE = 12
COE = 0
Total count of Enrolments in COE group = 5
Total percentage of COE = 5/163 = 3.1% ~ 3%
Click the wedge, “COE” to see all the Enrolments it is referring to.
5.1 Displaying all 12 Enrolments with Stage “GTE” and “COE” as in the example above.

6
This wedge represents a group, “Offer“, as indicated in the middle of the doughnut graph. ‘Offer’ group is composed of the following Enrolment Stage only:
- Offer
Upon hover, you’ll also see that there are 10 Enrolments with Stage “Offer”. If you could also notice that that hovered wedge pops a bit.
Example:
Total count of Enrolments = 163
Total count of Enrolments with the following Enrolment Stage:
Offer = 10
Total count of Enrolments in Offer group = 2
Total percentage of Offer = 10/163 = 6.1% ~ 6%

6
Click the wedge, “Offer” to see all the Enrolments it is referring to.
6.1 Displaying all 10 Enrolments with Stage “Offer” as in the example above

7

This wedge represents a group, “Application“, as indicated in the middle of the doughnut graph. ‘Application’ group is composed of the following Enrolment Stage only:
- Pre-Screening
- Application
- New
Upon hover, you’ll also see the breakdown (in terms of count) of percentage besides ‘Application’. If you could also notice that that hovered wedge pops a bit.
Example:
Total count of Enrolments = 163
Total count of Enrolments with the following Enrolment Stage:
Pre Screening = 3
Application = 1
New = 0
Total count of Enrolments in Application group = 4
Total percentage of Application = 4/163 = 2.4% ~ 2%
Click the wedge, “Application” to see all the Enrolments it is referring to.
7.1 Displaying all 4 Enrolments with Stage “Pre-Screening”, “Application” and “New” as in the example above

8
This wedge represents a group, “Inactive“, as indicated in the middle of the doughnut graph. ‘Inactive’ group is composed of the following Enrolment Statuses (regardless of Enrolment stage) only:
- Declined
- Withdrawn
- Visa Refused
- Early Withdrawn
- No Show
- College Terminated
Upon hover, you’ll see the breakdown (in terms of count) of the percentage besides “Inactive”. If you could also notice that that hovered wedge pops a bit.
Example:
Total count of Enrolments = 163
Total count of Enrolments with the following Enrolment Stage:
Declined = 27
Withdrawn = 93
Visa Refused = 1
Early Withdrawn = 0
No Show = 0
College Terminated = 0
Total count of Enrolments in Inactive group = 121
Total percentage of Application = 121/163 = 74.2% ~ 74%

8
Click the wedge, “Inactive” to see all the Enrolments it is referring to.
8.1 Displaying all 121 Enrolments with Stage mentioned in the example above

1
The Commission Summary shows you the money flow based on the Application’s course total fee. You can see this displayed in the Course Details Page (fees may change without prior notice).
In this simple and yet very informative infographic, in a nutshell, you will see the following:
- How much is the estimated amount of commission your company will receive?
- How much is the confirmed amount of commission?
- How much is the amount of commission that GSP is waiting from the Institutions?
- How much is the amount of commission that the Institutions has already paid to GSP?
- How much is the amount of commission that GSP has already paid to you?

Notice that there are numbers in tiny circles attached to the commission mount and arrows in between. This will serve as your guide so not to be confused which comes firsts, second, third, fourth and fifth.
Click any of these circles to see all the transactions that add up with the displayed amount. The following will further explain how these commission amounts were computed.
1
2

This is the first of the five commission amounts you should learn. This is called the Estimate.
This is the total estimated amount of commission that your company will receive from the total course fees of your ‘active and ongoing’ Applications. ‘Active and ongoing’ means that these Applications had started and actively being processed. However, confirmation of enrolment from the Institution was not yet received. Thus, unconfirmed Applications from Institutions remain as estimated commission.
In the ‘My Commission’ page, it will appear as one Transaction per Application.
2.1 Hovering to the ‘Estimate’, shows you a concise description.

2.2 Click the circle to view all the transactions total to the displayed amount.

3
This is called the Confirmed.
Once a confirmation from an Institution was received pertaining to an Application, confirmation such as the following:
- COE in Australia
- i20 in USA
- CAS in UK
The Transaction created used to have an estimate will:
- be divided according to invoicing period (Transaction Item)
- Invoice amount will be adjusted according to the information indicated in the received Confirmation of Enrolment document from the Institution

The amount that you see here is the total confirmed amount that you will receive from GSP. However, you cannot claim it yet because at this point, the commission payment from the Institutions (which confirmed enrolments) was not yet received by GSP.
In the ‘My Commission’ page, this is the total amount of all Transaction Items with status ‘Confirmed’.
3

3.1 Hovering to the ‘Confirmed’, shows you a concise description.
3.2 Click the circle to view all the transactions total to the displayed amount.

4

This is called the Ready to Invoice.
At this point, GSP had already sent invoices to the involved Institutions for commission payments, so GSP can pay you. If at least one Institution was not making any payment to GSP, then GSP cannot make any payment to you.
In this scenario, you, the Recruitment Partner, should send GSP an invoice for a commission payment as well. Please make sure that the invoice amount you will send to upGrad GSP is correct. If you are not sure or need guidance in computing the correct invoice amount, feel free to ask assistance from the upGrad GSP Commission Team. Learn how to ask help from upGrad GSP Commission Team.
In the ‘My Commission’ page, this is the total amount of all Transaction Items with statuses ‘Ready to Invoice’ and ‘Invoice Sent’.
4.1 Hovering to the ‘Ready to Invoice’, shows you a concise description.

4.2 Click the circle to view all the transactions total to the displayed amount.

5
This is called the Ready for Payment.
GSP has now received payment from the involved Institutions. Thus, the commission amount that you see here is the the total commission amount that GSP has commenced processing to give you the payment.
In the ‘My Commission’ page, this is the total amount of all Transaction Items with status ‘Ready for Payment’.

5

5.1 Hovering to the ‘Ready for Payment’, shows you a concise description.
5.2 Since the amount is zero. Then, there will be no item in the list of transactions

6

This is called the Paid.
This is the total commission amount that GSP has already paid you.
In the ‘My Commission’ page, this is the total amount of all Transaction Items with status ‘Paid’.
6.1 Hovering to the ‘Paid’, shows you a concise description.

6.2 Click the circle to view all the transactions total to the displayed amount.

1
In the ‘Homepage Menu‘, click ‘My Commission‘.
Only users that has Permission Roles, “Head Office Admin” or “Branch Admin” has the permissions to view this page.
Head Office Admin can view the commissions for the whole Company.
Branch Admin can only view the commissions for the branch he/she is related with.

Course View and Transaction View
There are 2 views available”
- Course View
- Transaction View
You can change views by using the toggle button. Where the white circles mean that’s the view being displayed. If the white circle is on the left then it means the Course View is being displayed. If the white button is in the right then it means the Transaction View is being displayed
1.2 Shows a toggle button and the view is Course View

1.3 If you want to change view, click the Transaction View and the white circle will move to its place. So, now it displays the Transaction View.

2
The first list you will see is the Course View. These are all the transactions created based on the number of students’ primary applications that your company has. As you may have observed, Transaction IDs start from letter C followed by 8 digits. Learn more about Primary Applications.

2
3
Keyword search as needed located at the rightmost of the page. You can search the following Transaction Details:
- Transaction Number / Trans ID
- Student ID / GSP ID
- Enrolment ID
- Application ID

4

Use the Advanced Search if you are looking for a more customised data set. This is the Advanced Search icon button. Click this to display the Advanced Search pop-up and input the criteria of your search.

You have three action buttons:
- Clear – to remove all the input search criteria all of the same time. This comes handy when you do not want to remove your inputs one by one. It can also be used when you want to return the list to it default state.
- Cancel – when you do not want to continue your search and close the Advanced Search pop-up
- Apply – to run the Advanced Search with all the criteria you have
4
5
Sort the list in ascending or descending manner by clicking the up and down arrows beside the field name. Ascending order is any of the following:
from the earliest date to the latest date
from A to Z
from 0 to 9

6

Use the Show/ Hide Fields if the fields you are looking for are not in the default view. Simply click this icon button and check the fields that you want to see in the list.
Uncheck fields to remove them from the list. Once your refresh this page, the display list will go back to its default state.

6
7

Use the Filter Columns if you want to search by column/ fields. It works the same way as the Keyword Search by typing a keyword but it will only search from the specific column where you typed.

8

Click this icon button to download the report you just created using the search functions. Whether you used the search functions or not, the content of the csv report you downloaded should be the same as what you see in the Course View list.
8
1
In the Transaction View, click the Transaction ID to view its details.

1
2
Click the Transaction ID to view its details.

In the Transaction Details you can view the following:
- Transaction ID – Use this to easily locate or search for this transaction in a list
- Transaction Type – Since you are a Recruitment Partner, this will always be an Agency Charge
- Total Transaction Course Fee – This amount is based on the Total Course Fee displayed in the Course Details Page. Course fee may change without prior notice.
- Currency – This is the currency that all the amounts displayed are based on
- Total Ex GST Amount – This it the estimated commission amount based on the Total Transaction Course Fee using the commission % as the multiplier
In the System Information you can view the following:
- Create By – who created the Transaction
- Created On – when was the Transaction created
- Last Modified By – who made the last modification/ update on the Transaction
- Last Modified On – when was the Transaction lastly modified/ updated

3
Below the Transaction Details you will find its Transaction Items. The number of Transaction Items you will find here are based on the number of invoicing period. Click the Transaction Item ID to view its full details.

Below the Transaction Details you will find its Transaction Items (TI). Transaction Items start with letter T followed by 8 digits. Transaction Items are based on the number of invoicing period. The Ex GST amount is the portion of the total course fee using the commission % multiplier.
Each Transaction Item may have different statuses according to GSP, Institution and Recruitment Partner Progress:
- ‘Draft‘ and ‘Estimate‘ – this is the Transaction status used to give the estimated commission amount that you will receive based on 3 factors, 1)Total Course Fee 2) No. of Invoicing Period 3) Commission Percentage
- Confirmed – this is the Transaction status used when GSP already received the Confirmation of Enrolment from the involved Institution
- ‘Invoice Sent‘ and ‘Ready to Invoice‘ – these are the Transaction statuses used when GSP is waiting for the Institution’s commission payment. At this point, you should also send GSP an invoice indicating the correct amount, so GSP can pay you once commission payment from the Institution was received.
- Ready for Payment – this is the Transaction status used when GSP has already received commission payment from the involved Institution. This is the amount you are waiting for GSP to pay you.
- Paid – this is the Transaction status used when GSP has already made the commission payment to you. This also indicates that the TI is duly closed.
Example
The total course fee of Bachelor in Industrial Design is AUD80,000 in Sta. Monica University with 10% commission. The invoicing period is 4. This means that the commission amount will be paid to you by GSP in 4 equal portions and in sequence. In the table and in the Transaction Item Record page, you will find in the ‘Sequence’ field which TI will go first over the other. These statuses of TI are then updated by GSP Commission Team accordingly.
Transaction Item 1:
Sequence = 1 (the 1st portion of total commission amount GSP should pay you)
exGST = ($80,000 / 4 invoicing period) x .10 = $2,000
Transaction Status: Paid
Transaction Item 2:
Sequence = 2 (the 2nd portion of total commission amount GSP should pay you)
exGST = ($80,000 / 4 invoicing period) x .10 = $2,000
Transaction Status: Ready for Payment
Transaction 3:
Sequence = 3 (the 3rd portion of total commission amount GSP should pay you)
exGST = ($80,000 / 4 invoicing period) x .10 = $2,000
Transaction Status: Estimated
Transaction 4:
Sequence = 4 (the last portion of total commission amount GSP should pay you)
exGST = ($80,000 / 4 invoicing period) x .10 = $2,000
Transaction Status: Estimated
3
4

On the right hand side of the Transaction Record Page, you will find the Application details. Click on any link to go the corresponding record page:
- Student GSP ID
- Enrolment ID
- Application ID
1
Click the toggle view button to see the list of all Transaction Items that are inside the Transactions. Transaction Item has already been expounded in the previous session.

1
2
This is the list of all Transaction Items that are found in all of the Transactions (Transaction from the Course View)

3
Keyword search as needed located at the rightmost of the page. You can search the following Transaction Details:
- Transaction Item ID
- Transaction ID
- Student ID / GSP ID
- Enrolment ID
- Application ID
- External Reference
- Student Name
- Vendor Invoice Reference

3
4

Use the Advanced Search if you are looking for a more customised data set. This is the Advanced Search icon button. Click this to display the Advanced Search pop-up and input the criteria of your search.

You have three action buttons:
- Clear – to remove all the input search criteria all of the same time. This comes handy when you do not want to remove your inputs one by one. It can also be used when you want to return the list to it default state.
- Cancel – when you do not want to continue your search and close the Advanced Search pop-up
- Apply – to run the Advanced Search with all the criteria you have
5
Sort the list in ascending or descending manner by clicking the up and down arrows beside the field name. Ascending order is any of the following:
from the earliest date to the latest date
from A to Z
from 0 to 9

5
6

Use the Show/ Hide Fields if the fields you are looking for are not in the default view. Simply click this icon button and check the fields that you want to see in the list.
Uncheck fields to remove them from the list. Once your refresh this page, the display list will go back to its default state.

7

Use the Filter Columns if you want to search by column/ fields. It works the same way as the Keyword Search by typing a keyword but it will only search from the specific column where you typed.

7
8

Click this icon button to download the report you just created using the search functions. Whether you used the search functions or not, the content of the csv report you downloaded should be the same as what you see in the Course View list.
1
Upload commission invoice to submit charges to GSP.
When a Transaction’s transaction type is “Agency Charge” and transaction status is “Ready to Invoice”, authorized logged-in user should be able to upload a commission invoice. There are 2 methods for RP to upload their Commission invoices.
Method 1: Find the transaction record in Student or Enrolment record.
Click “Commission” tab from the Enrolment Record. You’ll also find the same tab when you are in Student Record.

1
2
Select an Agency Charge transaction type and status should be “Ready to Invoice”. You will then be redirected to the Transaction Record.

3
Click “Submit Invoice” button to upload the document.

3
4

Drop the document/s you like to upload in the grey area.
5
Document/s you uploaded are automatically tagged with the following details:
- Category: Commission
- Sub Category: Invoice
You can drop more to upload multiple documents at once.

5
6
Click Upload button to proceed.
Click Cancel button if you do not want to push through with the uploading of the document/s.
7

This pop should be displayed to notify you that the document has been successfully uploaded and will now reflect on the GSP side.
7
8
Document/s you have uploaded will reflect to your own view of the Documents tab.

1
Method 2: Find the transaction record in My Commission List View

Use Advanced Search in the My Commissions Page wherein all transactions that you have access can be viewed.
2
Set the following criteria:
- Transaction Type : Agency Charge
- Transaction Status: Ready to Invoice
Then click “Apply” button.

2
3
A new column named “Invoice Document Count” appears. Ticked checkboxes indicate that invoice/s are already uploaded for that transaction. Hover to the checkbox to see how many documents are uploaded.
To proceed in uploading an invoice document, click the tickbox to display the document upload pop-up.

4
Drop the document/s you like to upload.

4
5

Document/s you uploaded are automatically tagged with the following details:
- Category: Commission
- Sub Category: Invoice
You can drop more to upload multiple documents at once.
6
Click Upload button to proceed.
Click Cancel button if you do not want to push through with the uploading of the document/s.
6
7

This pop should be displayed to notify you that the document has been successfully uploaded and will now reflect on the GSP side.
7.1 Notice that the tickbox of the transaction is now checked because of the file you just uploaded.

8
Document/s you have uploaded will reflect to your own view of the Documents tab.

8
1
If you feel stuck anywhere navigating around the upGrad GSP v2.0, you can always contact GSP using ‘Help‘ (? icon) located at the header.

Click the Help icon to see the list of GSP Team which corresponds to the concern areas which you may have. Click any of the following:
- Contact Admission – concerns in processing students, enrolments and applications
- Contact Commission – concerns like computing for a commission, commission did not match the payment made
- Contact System Admin – concerns in using the GSP App, functions that you need to understand or you think are not giving the correct output
1
2

A pop-out should be displayed so you can type your concern.
You’ll know that you clicked the correct GSP Team by looking at the top left of the pop-up. In the case of image in the left we are in “Contact Admission”
You can type anything in the Details part. This accepts any character and has no character limit.
You can also drop any related documents but this is not required. Learn more about Documents.
3
Type your concern in the Details

3
4
When you uploaded document/s you are required to identify the Category. You may also identify the Sub Category to help GSP Team Identify exactly what the document is for but it is not required.
5
When you are done filling out the details of your concern, click ‘Submit’ button. The assigned GSP Team shall receive this and attend get back to you within 2 business days.
In case you do not want to submit or you just mistakenly clicked the Help icon button, click ‘Cancel’ button to navigate out from this pop-up.
5
6

A confirmation should immediately be displayed once your concern has been sent to the assigned GSP Team.
1

Click the gear icon then OSHC Policies to:
- view OSHC policies you have created before
- create one
2
You can now view all the OSHC policies you have created and other OSHC Policies that you can access.

Learn more about OSHC Policies, such as comparing and creating OSHC Policies.
2
1
Announcements keeps you informed of the latest and helpful news like:
- Admissions like changes of requirements of a certain course from a certain institution
- Scholarship grants like offered by the government or institution body and it’s requirements
- Student services like new accommodation policies
- Fees and commission like changes in the tuition fees
- Key dates to watch out for like start of enrolments of certain institution
- Promotions like invitations to a conference
Each announcement has target audience. Thus, you will only access announcements that are applicable to your Permission Role. Announcements are also via your registered email in GSP App.
The red circle with a number in the Announcement icon, tells you the number of announcements you have not read yet. In the image below, it means you have 2 unread announcements. Click Announcement icon to view these.

New announcement also pops at the bottom right corner of your screen, Just click this to see more details. In case you do not like this kind of announcement that pops.

1
2

Upon clicking the Announcement, you’ll be able to see the announcements from the latest published date to the oldest unexpired ones. Expired announcements are no longer displayed.
You’ll see the published date of the announcement in GSP App at the bottom right. As for the image on the left, it was published last 02 March 2022.
Click the announcement to see more details about it.
3
Some announcements, when you click them will redirect you to another page like the image below. It asks you to register to the upcoming conference. You can then share the invitation to anyone who might be interested.

3
4
When you go back to GSP App, you shall see a pop about the event. Scroll down to learn more about it.

5
After reading the details, please send feedback to GSP Admin if you like or dislike the announcement. Like was it helpful or appropriate to you or not.


Click thumbs down if you find the announcement unhelpful.

Click thumbs down if you find the announcement unhelpful.
5
6
Click the close button (x) at the top right of the announcement pop to close it

There are also times that the close button is there but not visible due to the background and the close button color are same white.
Another way to close the announcement pop is to click anywhere outside it.

7
By default, when you click an announcement, it will be marked as “Read”. Just click the uncolored circle (Mark As Unread) to bring it back from being unread. Means like you want to go back to it or something else.
The red circle in the Announcement icon (megaphone/ bull horn) should be reduced as you mark announcements to unread.
7.1 Unread announcements look like this, the circle is colored. You can also click this if you want to mark it as already read.

7

7.2 If you don’t feel like marking the announcements one by one, click “Mark all as read”.
8
Click this toggle button to display only unread announcements or show all.
Click the Announcements icon to remove this display.
You can also set announcement preferences in My Profile.

1
Notifications are updates or progress you need to know about the following items you are linked with:
- Enrolment
- Application
- Transactions
Updates on any records you created are also included here.
Notifications is represented by a bell icon. The red circle tells you how many unread notifications you have.
Click Notifications to see them especially those you have not read yet.

1
2

Upon clicking Notifications, you will see the list of all notifications. By default, it displays all notifications. But just like in Announcements, you can change the settings.
3
Each notification has the following elements:
- ID of what is being referred to
- Profile picture of the person who made the update. GSP logo means, the GSP Admin made the updates. As per the example on the image on the right, the 3rd notification tells you that Richard Asunto (profile picture) made the changes
- Description of the notification
- When it was updated
- Read and Unread Notifications – this is the dot at the top right. If it’s colored means it is new and you have not read it yet. If it’s uncolored, means you already clicked it.
Click the ID to be redirected to the specific record it is referring to.

3

A notification will automatically be marked as read when you click it. In cases that you don’t want to click or be redirected to the specific record page but you have already read all the notifications, you can just click “Mark all as read”. The red circle in the Announcements icon will then be removed.
4
Clicking this toggle button allows you to change what notifications you would like to view:
- Show unread only
- Show all
Click the Announcement icon to remove this display.
You can also set notification preferences in My Profile. Click here to learn more.

This is your company logo. Only GSP Admin can set and update this.

1
Before you set your profile picture in GSP App, make sure that you have a square, clear and front facing image of yourself that you will use. The image type should not be a problem as GSP App should be able to accept any logical image format such as .jpg, .jpeg, .png, etc.
Click the person icon in the GSP Header to set your profile picture.

1
2

Click ‘Update Profile Image’. Click the ‘Update Profile Image to do the following:
- Set your profile picture the first time
- Change your profile picture
3
A pop-up should be displayed where you can drag and drop your profile picture in the box.
Notice that the ‘Set as Profile Image’ is not enabled. This will only be enabled when you put a picture in the box.

3
4

Drag and drop your profile picture only in the grey area. Otherwise it will not be attached.
5
You’ll immediately know that you dropped the correct image. You can also check the file name at the top left.
In case you want to change this, just click the ‘x’ mark beside the file name and repeat steps 3 – 4.

5
6
If you are satisfied with the image you dropped, click ‘Set as Profile Image‘ to confirm.
In case you just mistakenly clicked the Update Profile Image, click ‘Cancel‘ button to navigate out from this pop-up.
7
Once successfully set, your profile picture should be immediately displayed in the header replacing the previously person icon.

7
1

Click your profile picture if you have already set it. Otherwise, click
2
Click My Profile to be redirected to your profile record page where you can view and update your details.

2
3
By default, the My Profile tab is open. Here you will find your details

4
Click “Edit Record” icon to edit details. It’s good to always update this because some details are visible to selected users like your Branch Admin or Head Office Admin.

4
5
Fields become editable when text field is white. You cannot edit fields that re in grey.
Important. At this point, you can change your email. Thus, be careful to note that whatever email you replace here should be username you will use when logging back in to GSP.
6
Click ‘Cancel’ button if you do not want to save your changes.
Click ‘Update’ button if you want to save your changes.

6

6.1 This pop should be displayed to confirm that you have successfully updated your profile details. This pop shall be removed by itself after 5 seconds or so.
7
You should be able to view immediately the changes you have saved.

1

Click your profile picture if you have already set it. Otherwise, click
2
Click My Profile to be redirected to your profile record page where you can view and update your details.

2
3
In your page, click ‘Change Password’ button.

4
This should be displayed so you can type your new password. Your answer in Password and Re-enter Password should match for validation purposes. Password should be a mix of uppercase&lowercase letters, number and special character.

4

4.1 Your inputs are covered in this manner for security purposes.
5
Click ‘Cancel’ if you do not want to proceed.
Click ‘Submit’ if you want to proceed in changing your password.


5.1 This pop should appear to confirm that you have successfully updated your password. So, the next time you log in you should use the new one.
1
Use GSP App to sync your email from outlook and vice versa. You can also send email using GSP App. The following let’s you set up first before you can send and receive emails in GSP App.
This works for now in Outlook accounts only.

Click your profile picture if you have already set it. Otherwise, click
2
Click My Profile to be redirected to your profile record page where you can view and update your details.

2
3
Click Email tab.
Email Group
Someone from the GSP Admin will set this up so whenever there are like announcements for email blasts, you can be included. If you find this blank for now, it means there are no email group created for you yet.
4
Outlook Calendar
If you are using Outlook account then you can sync together your events calendar. Just fill it out with your MS Outlook account. Click Update Outlook Calendar.

4

4.1 This will appear for 5 secs or so when you have successfully updated your Outlook Calendar Account
5
Email Signature
You may copy paste your existing email signature from your work email.
You can also create from scratch. You can style your signature using the text menu styles
6
If you are not sure what to type, click “Get Template” to have a sample. Just edit it according to your correct details

6
7
If you are fine with the signature that you have, click “Update Signature”. This shall be used whenever you send emails using the GSP App.
1
You can make some settings on which platform you would like to be notified other than the GSP App. Much like preference settings in Notifications.

Click your profile picture if you have already set it. Otherwise, click
2
Click My Profile to be redirected to your profile record page where you can view and update your details.

2
3
Click Notification Alert Channel tab.
Selected Channel
This is where you would like to be notified outside GSP App. This is other than viewing it in the Notifications. As of now it can only be set to Email. But 3rd party apps will follow like Viber, WhatsApp, Facebook, etc.
Channel Address
Type here the Email address where you would like to be notified. If this is correctly set up, you will receive email notifications same as what you can view in the Notifications (bell icon in the header).
4
Active
Check the box if you want to receive notifications in the email addresses you entered.
Delete
This is the trash bin. Click this to remove the email address completely

4
5
Click this “+” if you would like to add more recipient channels.
6
New fields will appear. When you select a channel, channel address field will appear so you can type the account where you would like to receive the notification.

6
7
Click “SAVE” button to save your updates.

7.1 Upon successful saving of the details. This pop will be displayed for about 5 seconds.
By default, new announcement pops at the bottom corner of your screen.

You can hide the announcement pop by going to announcement settings.
1

Click your profile picture if you have already set it. Otherwise, click
2
Click My Profile to be redirected to your profile record page where you can view and update your details.

2
3
Click Announcement tab.
Hide Announcement Pop Up
To remove the announcement pop, click the square to check it. This means you want to hide the announcement pop.

4
Click SAVE to apply the changes you have made.

4.1 will be displayed for about 5 seconds so you’ll know that the announcement settings have been saved.
4
1
You can find the Main Menu in the GSP Homepage. Click any of the icon buttons to navigate around the GSP App. Icon buttons below are the features that your Company has access to (e.g., Course Search, My Students, My Enrolments, My Applications, etc.). It still depends though on your Permission Role as discussed at the start of this module, Understanding your Permission Role.

1
2
You can also find all the menu in the side bar. The heavy colored icon button indicates which page you are in. In the image below, it is the Mange Students Page.
2.1 Hover or click an icon button in the sidebar to view the full name of the icon button. Click again to be navigated accordingly.


3
Click this 9-dot icon button to go back to GSP Homepage.

3
1
You can find the Main Menu in the GSP Homepage. Click any of the icon buttons to navigate around the GSP App. Icon buttons below are the features that your Company has access to (e.g., Course Search, My Students, My Enrolments, My Applications, etc.). It still depends though on your Permission Role as discussed at the start of this module, Understanding your Permission Role.

1
2

Click the toggle button above the list to see a report type of report listing.
3
This is a simple type of record list, called the Report View. Just click again the toggle button if you prefer the previous type of listing (with student profile picture).

3
4
All Record List Pages have pagination below where you can view all the pages of the list

5
Sometimes you may notice a cloud that appears beside the Keyword Search.
This means that there are updated data in the record page waiting to be reflected on the list or wherever the data also appears.

5
1
You can find the Main Menu in the GSP Homepage. Click any of the icon buttons to navigate around the GSP App. Icon buttons below are the features that your Company has access to (e.g., Course Search, My Students, My Enrolments, My Applications, etc.). It still depends though on your Permission Role as discussed at the start of this module, Understanding your Permission Role.

1
2

If you are in the Report View, click the GSP ID Link.

2.1 and 2.2 Record ID links looks the same across GSP App. Whenever you see something like this, means it is clickable and you can go directly to the record page.

3
This is what a Record page would look like. A Record Page is where you can see all the details about that particular record (e.g., Student, Enrolment, Application)
Try clicking the other tabs of a Record Page, in the image below are — Enrolment, Documents, History, Cases,Commission, Events, Student and Notes. Notice that the color of the tab changes from green to white depending to which detail it displays. When the tab is color white, it is the record detail that is being displayed. Image below displays the Enrolment details.

3
4
When you set a record page to “Watching”, you will receive notification whenever updates are made into the record by:
- Notification in the header (bell icon)
- Via email according to your set up in the Email Settings page in My Profile
Click Watch (binoculars icon) to see who else are watching this record and if you want to change the setting from “Watching” to “Not Watched”
When Watch is colored, it means you are currently watching updates in the record already.

5
Clicking Watch will display:
- list of people watching the same record
- action button where you can change watch settings, either you want to watch it or stop watching
In the image below clicking “Stop watching this record” will turn the watch icon into grey color. This means you will no longer receive any notifications when an update has made to this record.

5
1

It is always safe to logout whenever you are done using GSP App.
Click your profile picture if you have already set it. Otherwise, click
2
Click ‘Logout’. You should then be navigated to GSP login Page.

2
3
You’ll be back to GSP App Login Page.
