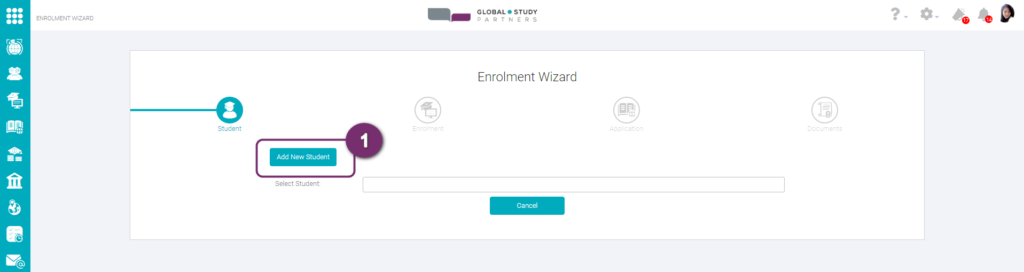
Once you have selected the desired course to apply, you will enter the first step of the enrolment wizard. You can click on the ‘Add Student’ button. You can do this from your computer or your mobile device. In both cases, you need to use the upGrad GSP from your browser.
1
2
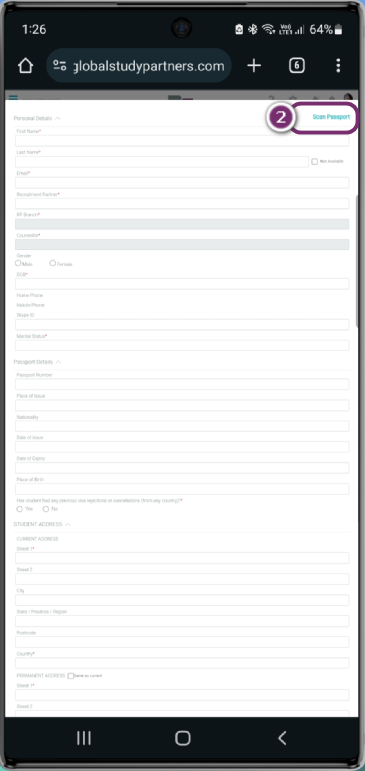
A window to insert student details will appear. You will see the ‘Scan Passport‘ button at the top right. You can click it.
3
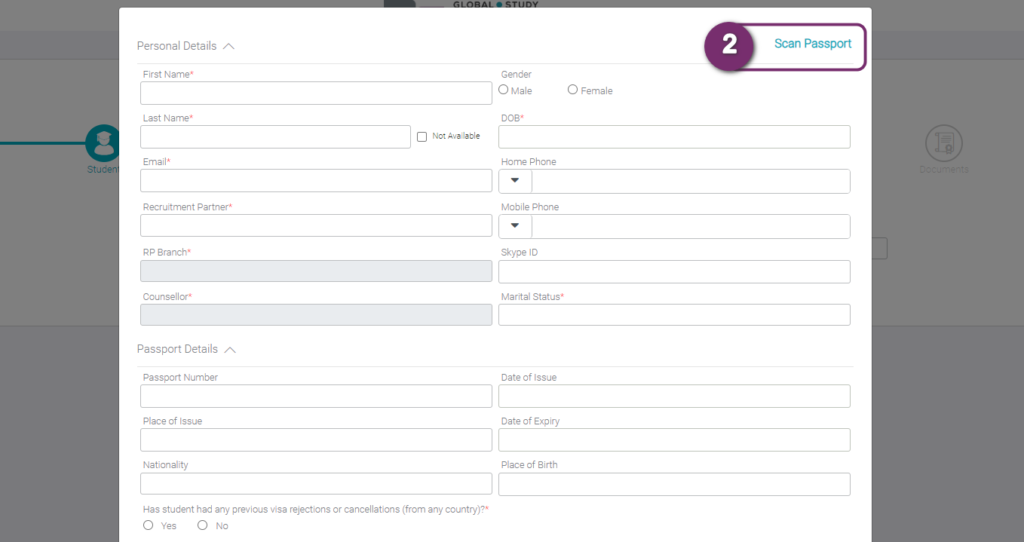
You will be able to see a pop-up window from where you can either:
3.1 Take a photo of the passport, or 3.2 Directly upload the image file.
3
3.1 If you click on ‘Take Photo’ button, the camera in your computer or mobile open up. You can take a photo of the passport by clicking on the ‘Take Photo’ button here.
An option to switch camera is also provided to you in case you are using mutiple camera in your laptop; or flip the camera in your mobile phone.
If you have a file to upload, click on the ‘Go Back’ button.
3.1.1 Once the photo taken is clear and as desired, you can click on the ‘Upload’ button.
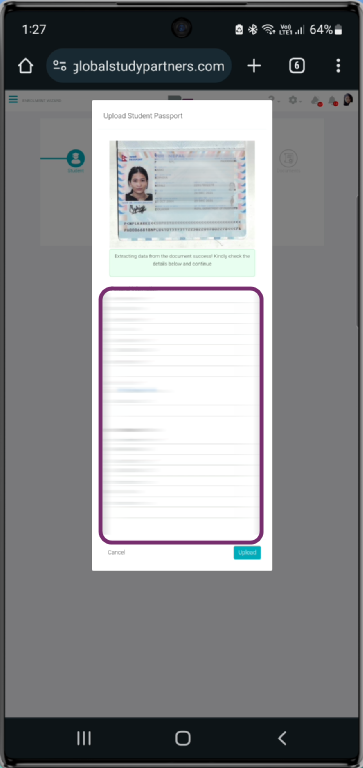
3.2 After clicking on the ‘Select file’ button, you can browse the scanned image file of the passport. Select the file and upload it into the system.
3.2.1 The system scans the passport and extracts the details from the document. The extracted details are displayed below which can be proofread. If anything is incorrect, it can be corrected. Anything left blank by the system can also be filled.
3.2.2 Once all the details are filled up, click on the ‘Upload’ button.
4
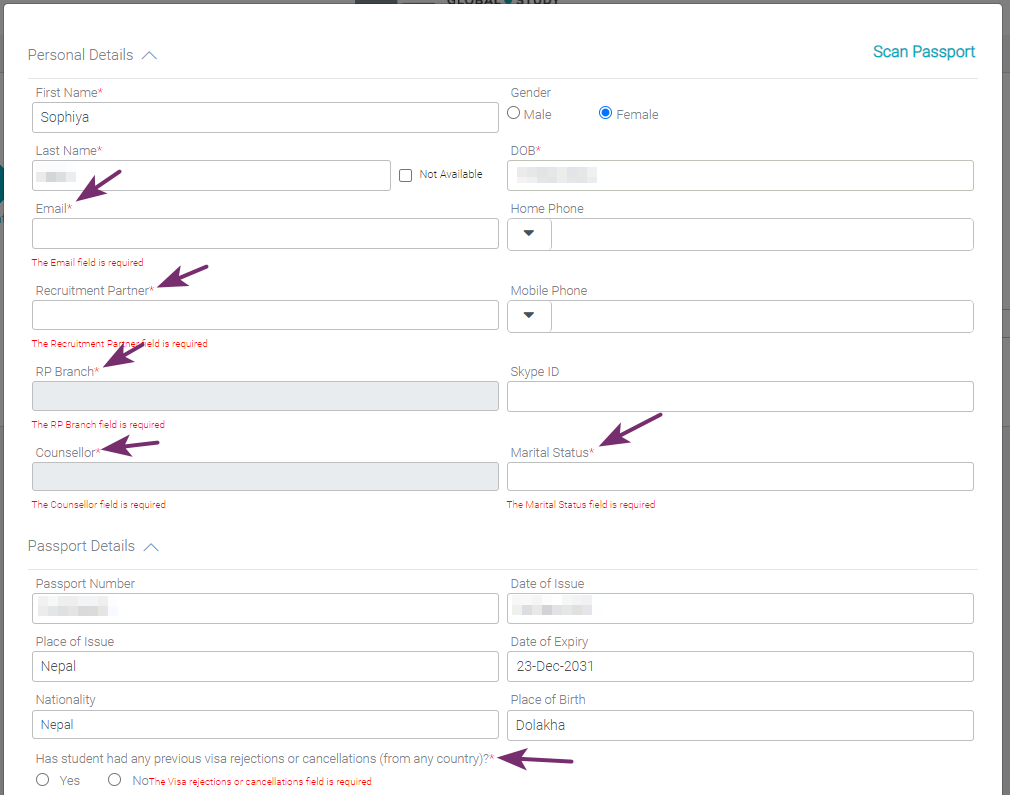
After clicking the upload button, all the information will be populated in the student’s profile form. Not all fields will be filled as the passport will not have all the required information. You can input all the necessary fields like Email, Student Address, Emergency Details and Work Experiences.
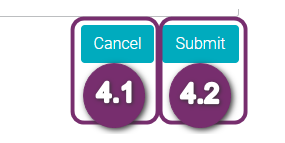
4.1 Click ‘Cancel’ button if you want to close the pop-up display.
4.2 Click ‘ Submit’ if you want to submit all the information to the system and build the student’s profile.
However, all the mandatory fields must be filled out before clicking the submit button. Else the form will not be submitted showcasing the required fields.
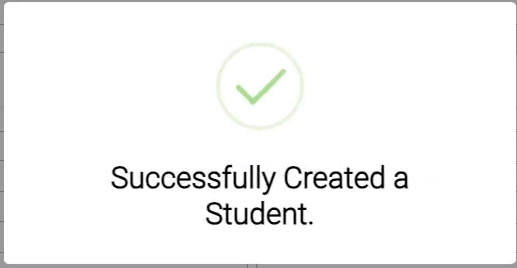
Once all the mandatory fields are being filled and submitted, a confimation pop-up of successfully creating a student appears on the screen.
Lesson 2 Verifying documents during upload | Session 1 Verifying documents during upload
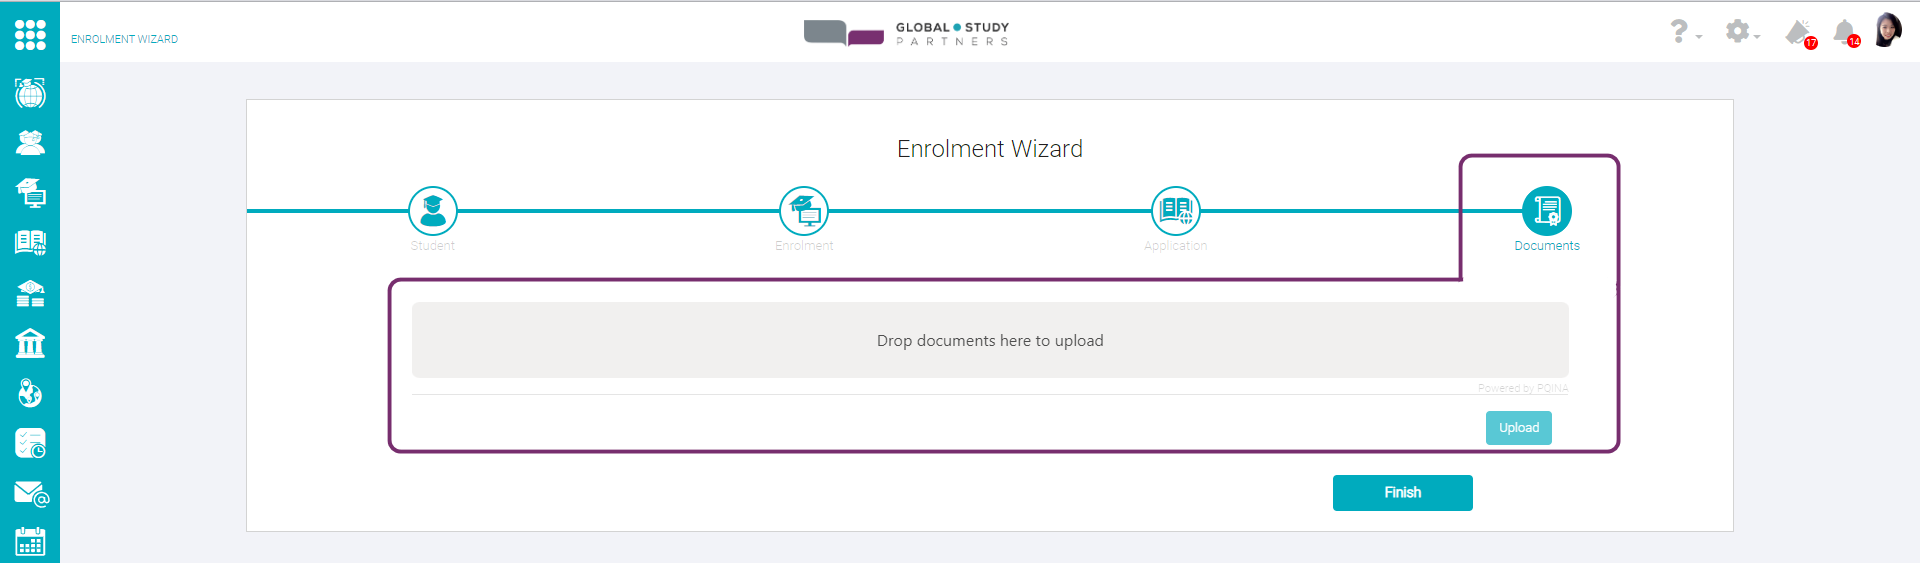
After the student profile has been created, you will have to complete Step 2 and Step 3 of the enrolment wizard. If you are unaware of these steps, check our our Enrolment Wizard section of the Academy. Step 4 is where you will be able to upload the documents.
1
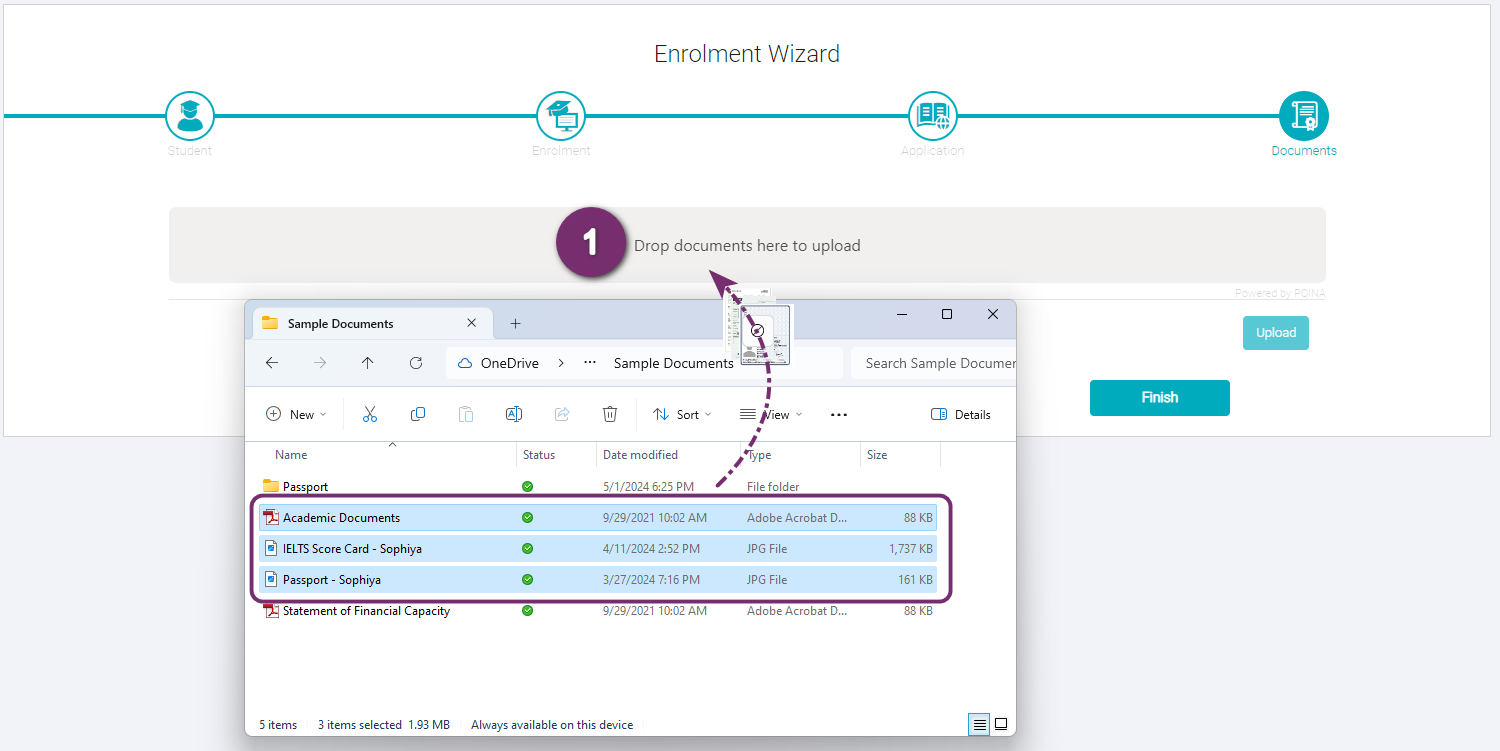
You can now upload the documents of the student by click on the grey area that mentions “Drop documents here to upload” or drag and drop the files to that area. The documents will be displayed in the placeholder. You will need to select the Category and Sub Category
The documents will be displayed in the placeholder. You will need to select the Category and Sub Category. Note the Status of the documents appears as ‘No Category’ in red.
2
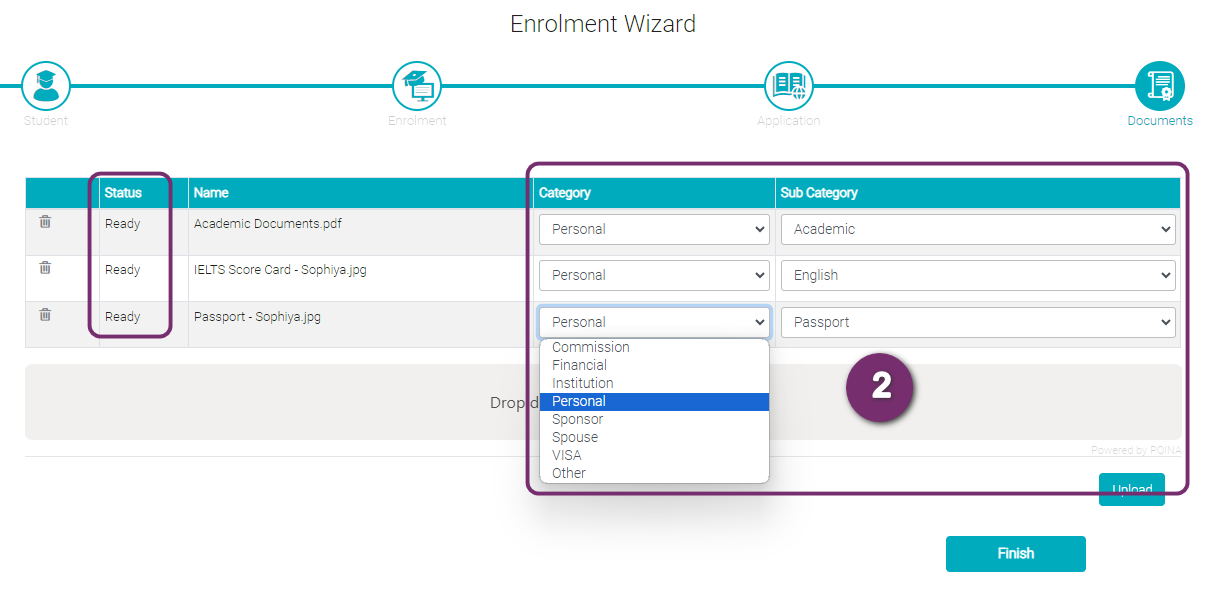
Select the respective Category and Sub Category for each document respectively. The status also gets changed to ‘Ready’.
2
3
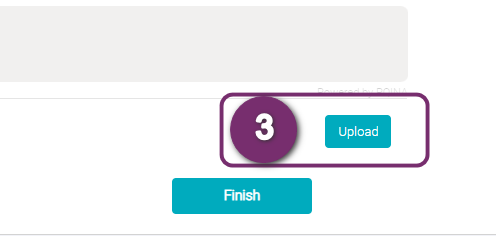
Once all the documents are ready, click on the ‘Upload’ button
4
Once all the documents are ready, click on the ‘Upload’ button
4
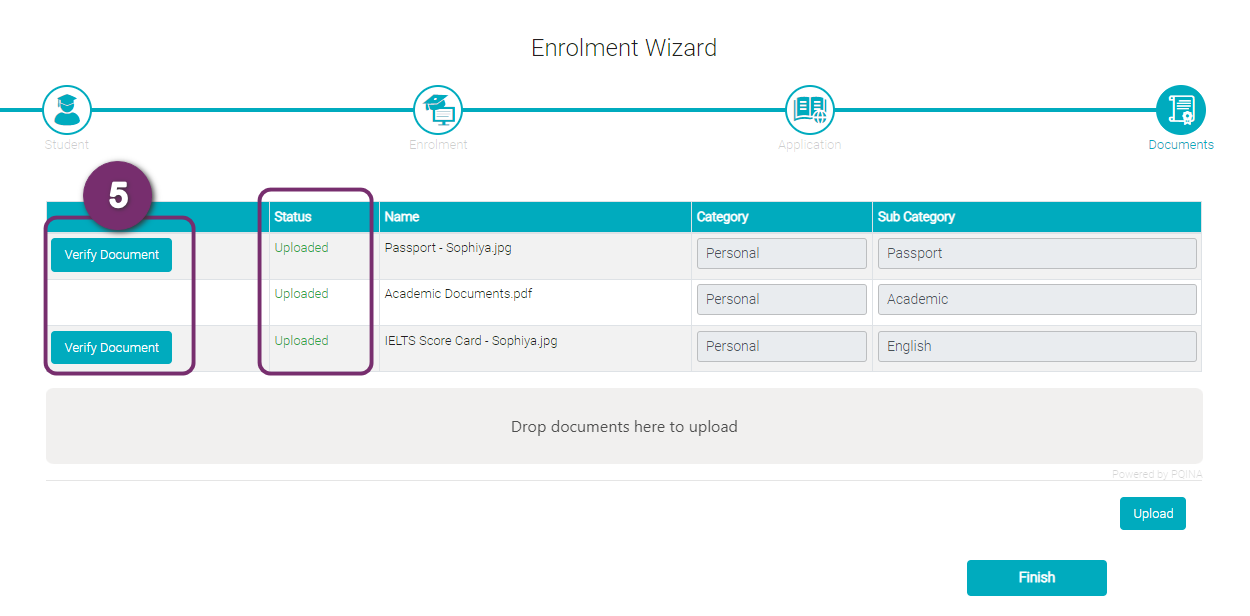
5
The status of the documents will be changed to ‘Uploaded’. You will also be able to see the ‘Verify Documents’ button in front of the documents which is assigned a subcategory – ‘Passport’ and ‘English’. Click on one of the ‘Verify Documents’ buttons to proceed to take a live photo of the student.
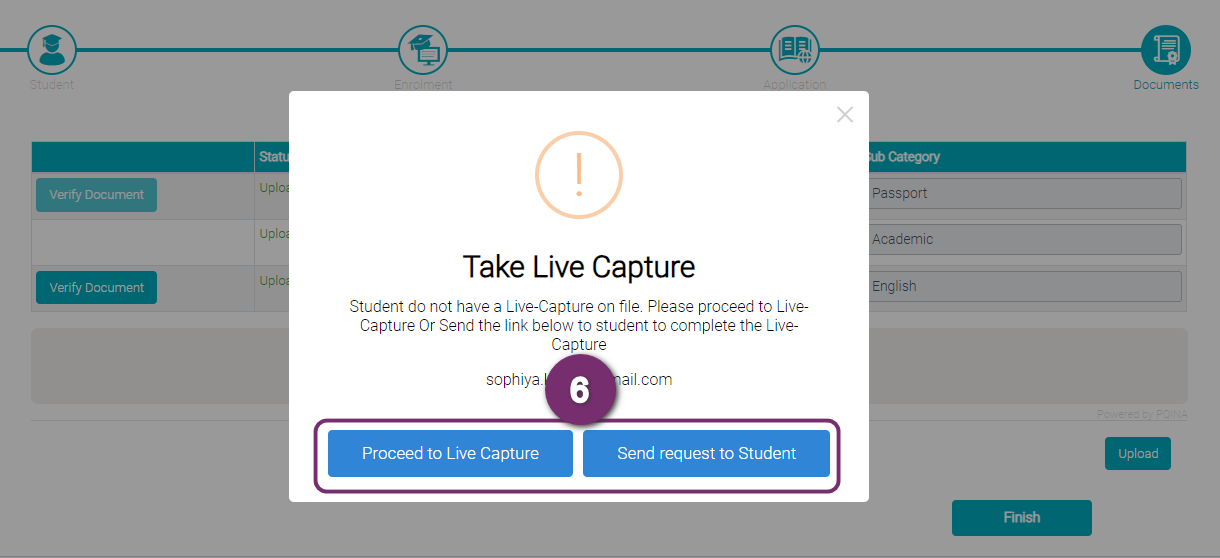
6
Another pop-up appears with two options – ‘Proceed to Live Capture’ or ‘Send request to Student’. You can click any of them to capture the student’s photo. We have a separate lesson on this. Please refer to Take Live Photo.
6
7
Another pop-up appears with two options – ‘Proceed to Live Capture’ or ‘Send request to Student’. You can click any of them to capture the student’s photo. We have a separate lesson on this. Please refer to Take Live Photo.
8
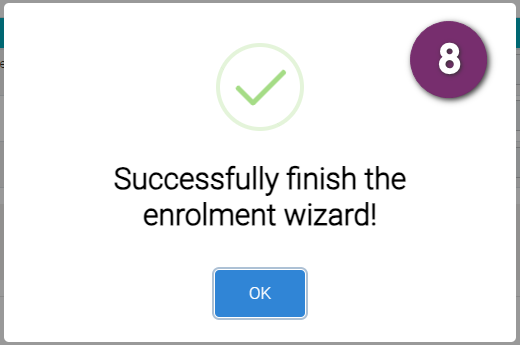
A notification pop-up appears confirming the Enrolment Wizard has been successfully created.
8
Lesson 3 Taking Photo
1
To do the verification of the documents, we will need a photo of the student. This photo is to be taken live from the system. We cannot upload a photo file into the system. For this we need to go to the student’s profile. To do so, click on the My Students button on the home page, and select the student you want to take the photo of by clicking on the photo icon on the list view.
2
Click on the ‘Take a Live Photo’ button below the photo placeholder.
2
Lesson 3 Taking Photo | Session 1 Take Live Photo
1
A pop-up window appears, where you can select to ‘Proceed to live Capture’. To use this function the student must be with you.
2
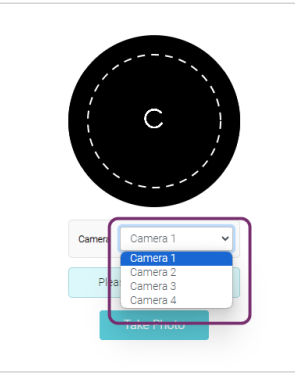
The system will open up the interface with the camera turned on. You can switch between the camera as well.
2
3
Ask the student to put the face right at the centre of the white circle. The system will guide you to Move forward, face the camera, smile, look to your left, look to your right etc. The Take Photo button becomes activated and you can click on it.
After the photo has been taken, if you are not satisfied with the outcome, you can choose to
3.1 Retake Photo 3.2 Cancel to close the photo-taking interface. 3.3 Upload the photo as the Live Photo to student’s profile. Same photo will be used
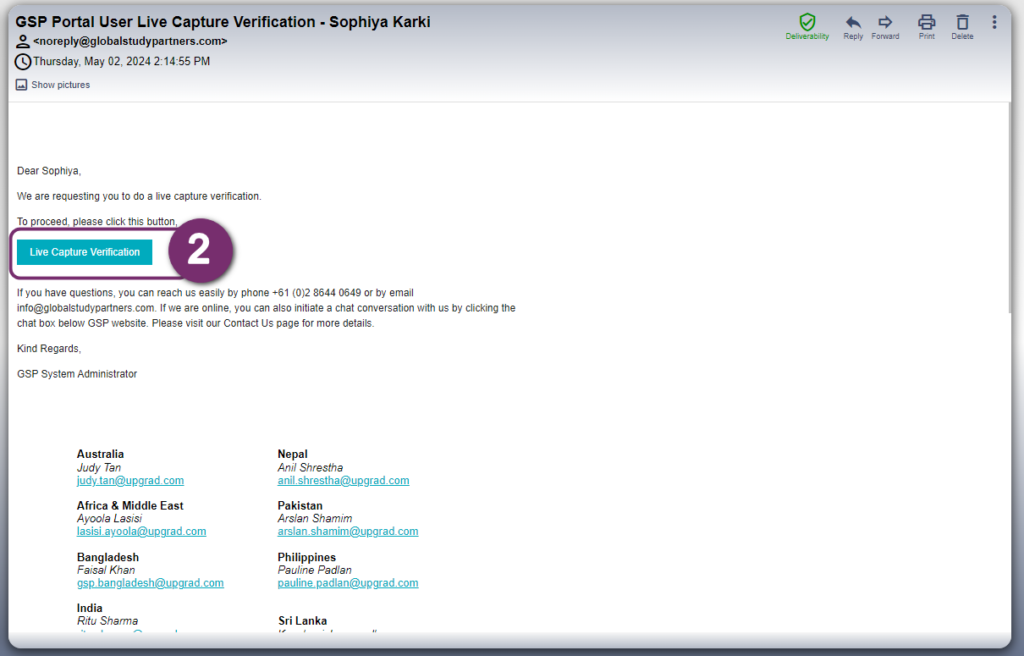
When the student is not with you, you can also click ‘Send Request to Student’ option. The student will be sent a link into the registered email address.
2
The student will receive an email with a button mentioning ‘Live Capture Verification’. The student can click this and the photo-capturing interface and follow the displayed instruction.
2
3
The student can change the camera and follow the instructions. Once ready, the student can take the photo by clicking on ‘Take Photo’ button.
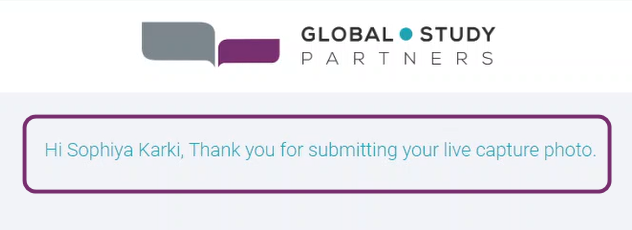
Once the photo is captured, the student can:
3.1: Retake the photo, if they do not like it or 3.2: Upload the photo for document verification. This photo will also stay as the profile picture of the student.
A confirmation message appears stating that the photo has been successfully submitted.
4
The student can change the camera and follow the instructions. Once ready, the student can take the photo by clicking on ‘Take Photo’ button.
Open up the enrolment for that particular by clicking the Enrolment button from the home screen. You will see the following listing.
2
Click on the photo icon of the student, to open the enrolment page and select the ‘Documents’ tab.
2
3
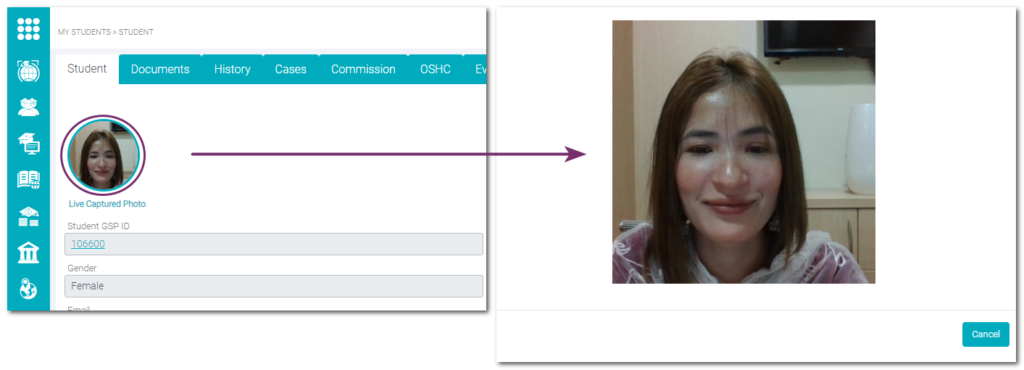
This will open up the list of documents. We are trying to verify the Passport here. So click the respective document to open the detail view of the document.
4
You will see the View Document window, you can see the description part here is empty. Also the status of this document at the moment is ‘New’.
4
5
Click on the ‘Verify Document’ button at the top right corner to start the verification of the passport’s photo with the student’s live photo.
6
The system starts the verification process. A message appears at the top to wait for the process to complete.
Once the process is completed, you will see the percentage match between the top photos. In this example. you can see it is a 100% match. You will also see a message stating that it is a good match.
However, if % match is lower than 75%, then it won’t give you the option to “ACCEPT & VERIFY”. You can only “REJECT” and repeat the process.
You can:
6.1: Accept the verification by clicking on the “Accept and Verify” button at the bottom right. 6.2: Reject the verification
6
7
Once you accept the verification, a notification pop-up appears stating the document has been successfully verified
Lesson 4 Verifying documents after upload | Session 2 Verifying English Proficiency
1
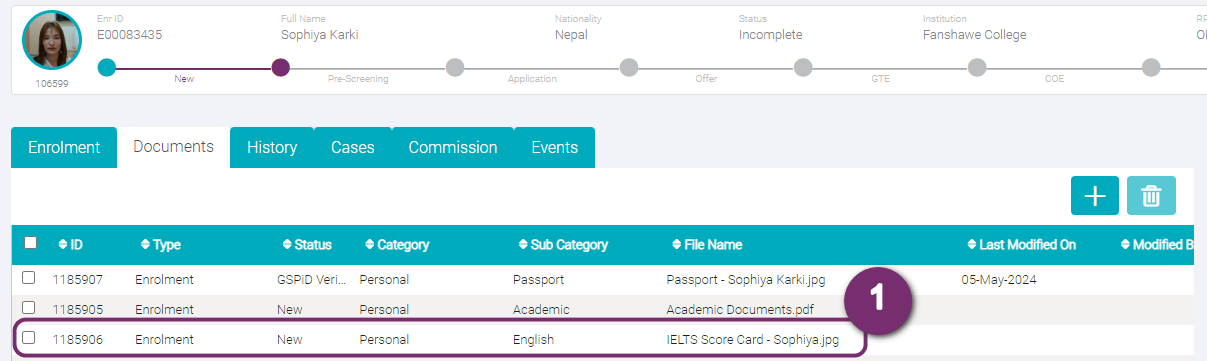
Once you are have reached the documents section in the Enrolment page of that student, click on the IELTS document from the document list.
1
2
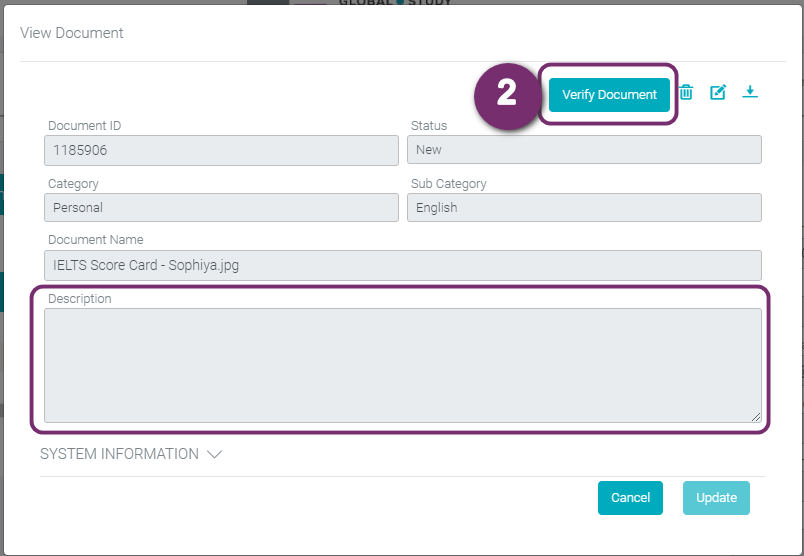
You will be able to see the details of IELTS documents. The description section is empty and the status here is ‘New’. Click on the ‘Verify Document’ button at the top right to start the verification.
3
As this is the verification of the IELTS scorecard, the system will provide information on the TRF Number detected from the uploaded IELTS scorecard. Please double-check if the TRF Number has been captured correctly. The most common thing to watch for is that the number 0 is usually mistaken as the letter O or letter D and vice versa. The TRF field is intentionally left as an editable field so you can correct it as necessary.
Click ‘Proceed’ to continue the process.
3
4
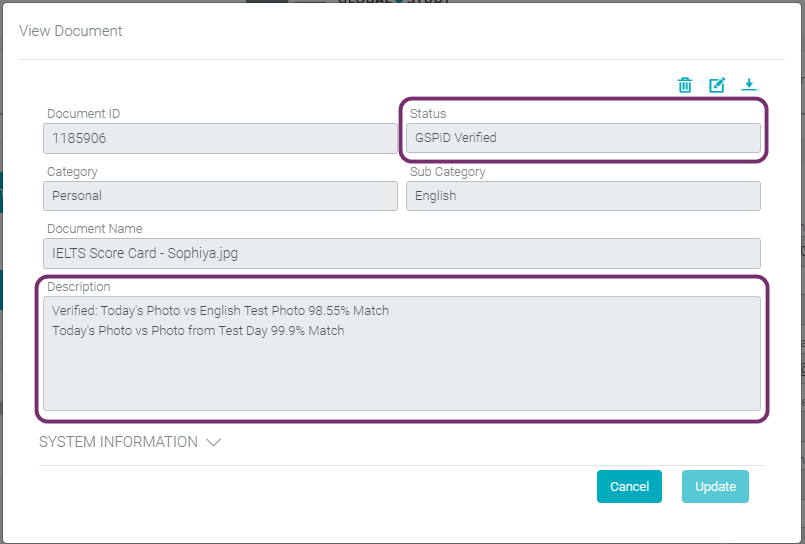
As this is IELTS Scorecard verification, the student’s live photo is verified with the TRF scorecard photo as well as the photo taken on the test day directly from the IELTS database. Following is the result, you can see the percentage match. In this example, you can see the percentage match as 99% and 100% in the two verifications respectively. Here the % match is more than 75%, thus, you can “Accept and Verify”.
However, if the % match is lower than 75%, then it won’t give you the option to “Accept & Verify”. You can only “Reject” and repeat the process.
You can then:
4.1: Accept the verification by clicking on the “Accept and Verify” button at the bottom right. 4.2: Reject the verification
5
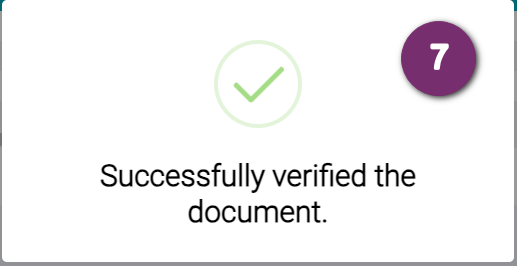
Once you ‘Accept and Verify’ the document, you can see the confirmation pop-up as below.
Open up the enrolment for that particular by clicking the Enrolment button from the home screen. You will see the following listing.
2
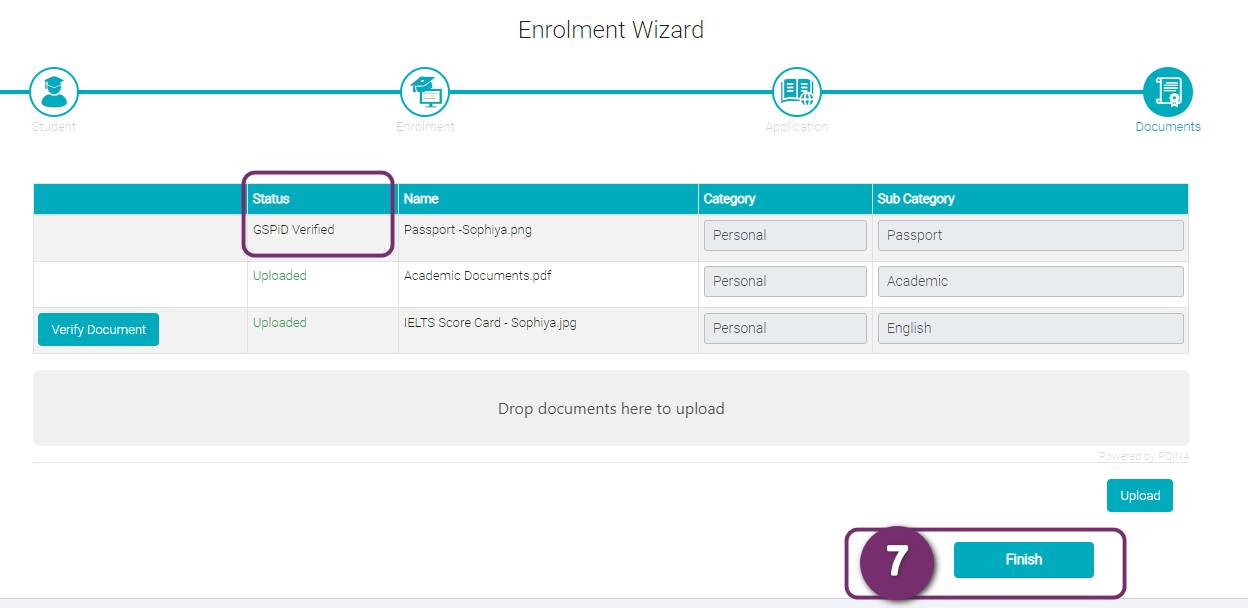
If you click on any verified documents, in the View Document pop-up, you will see the status as ‘GSPiD Verified’ and the description that gives the details of the % match.