Link counsellors to their respective office branches
Permission Roles – features that Counsellors can access based on their roles
Reset counsellor’s password
View history of activities
Lesson 1 Get Started | Session 1 Create Password
1
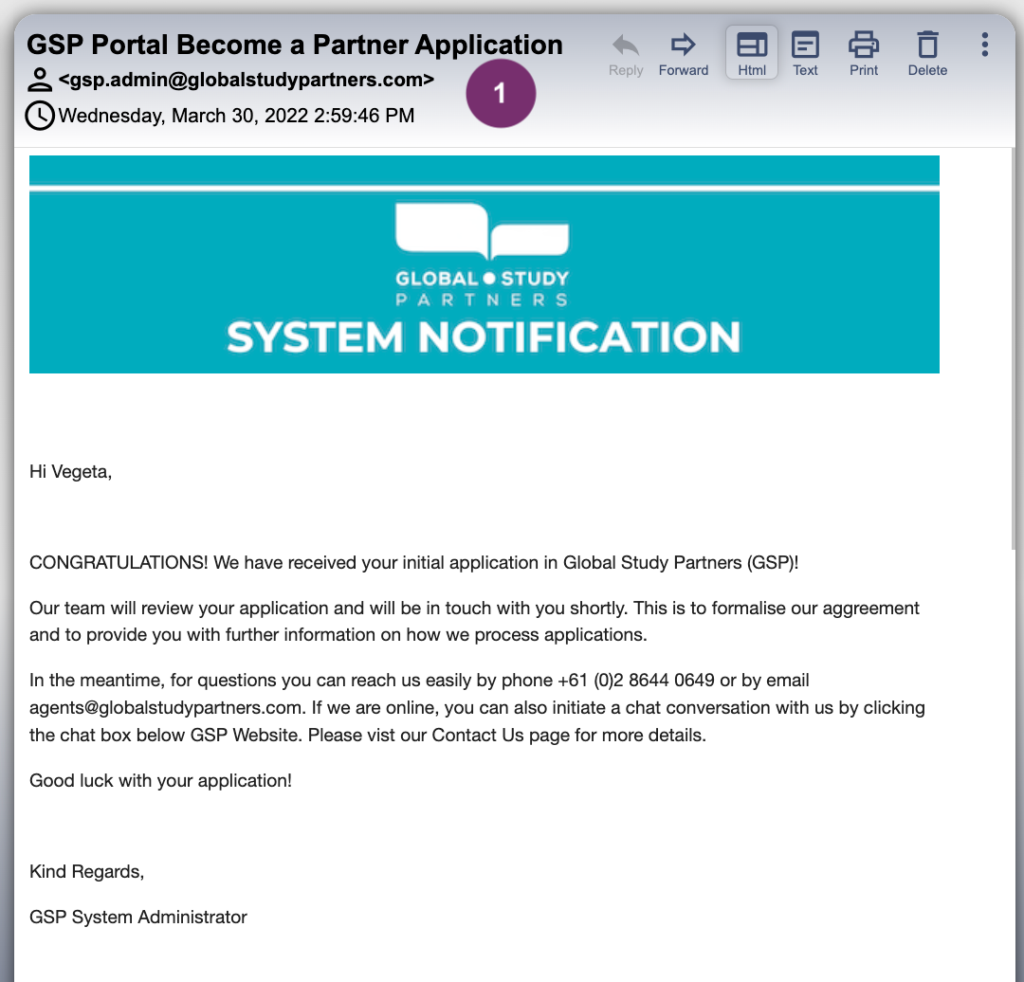
You shall receive 2 emails after submitting your Become a Partner Application.
One email acknowledges your application and some information at the bottom on ways how to connect with us.
2
Another email should have a title ‘upGrad GSP Portal User Account Registration – <Your complete name>. Name is what you have provided in the Company Primary Contact. This email has instructions on how to:
log in (initially by creating password)
set your profile picture
2
3
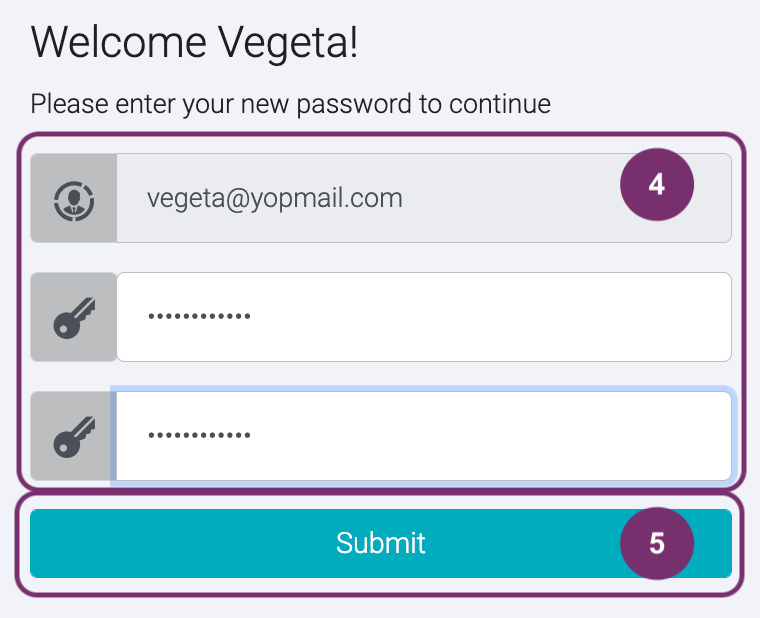
As mention in the email, click ‘upGrad GSP APP’. It is a link that will redirect you to create your password.
4
Type in your desired password twice. Password should have the following criteria:
at least 8 characters
combination of small & big letters and numbers
use special characters like ‘@’ to make your password more secured
4
5
Once you are done entering your password, click ‘Submit’ button.
6
A pop will be displayed confirming that you have successfully created your upGrad GSP password. Click ‘OK’ to go to the login screen.
6
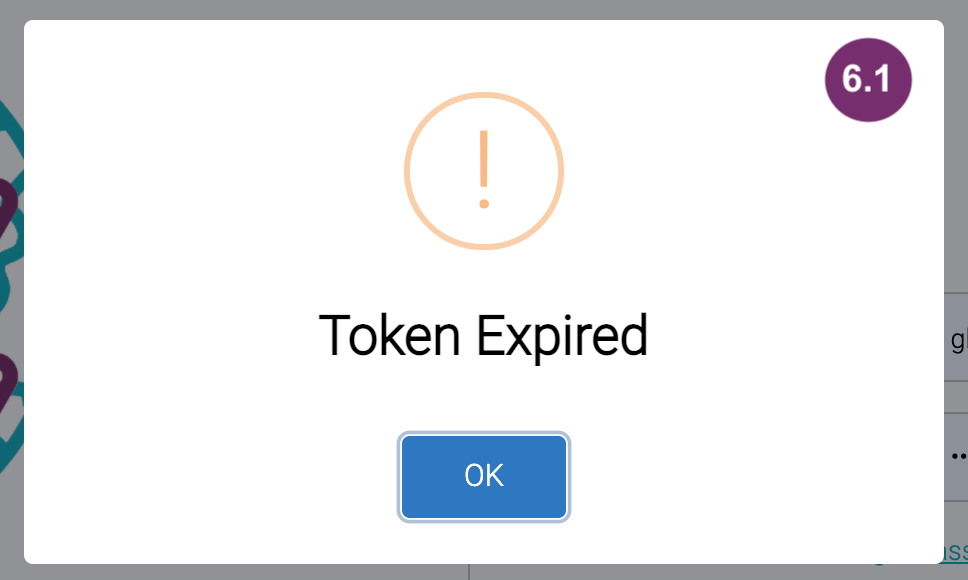
6.1 If you are seeing this message it means that the email was sent to you over 24 hours ago. You may try ‘Forgot Password’ feature in the Login Page to attain a new email. Learn how to use Forgot Password feature.
Lesson 1 Get Started | Session 2 Login
1
Go to Login Page and input your credentials correctly, username and password.
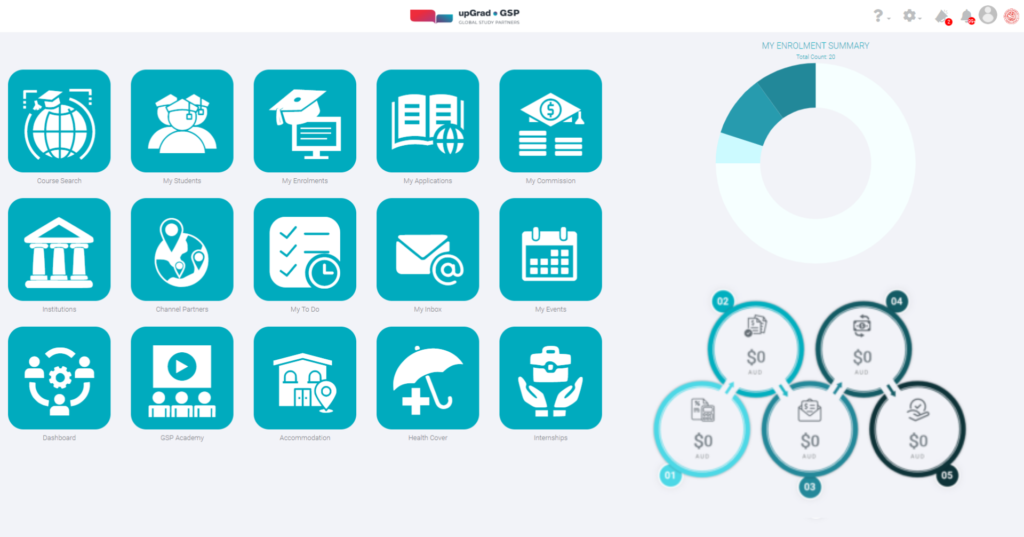
You will enter the home page. On the screen you will be 15 navigating buttons. The Enrolment Summary Pie Diagram on the top right and Commission Summary Circles on the bottom right.
Type the email that you use when logging in to upGrad GSP App.
Then, check the square beside the “I’m not a robot” and answer a few questions if there are.
Click “Send Link”
2
3
You shall then receive an email asking you to create new password. In the email you received click “Create New Password”
4
Type your password twice. The second field, ‘Re-enter your password’ validates if you have remembered your password correctly. So, these should match. Password should have the following criteria:
at least 8 characters
combination of small & big letters and numbers
use special characters like ‘@’ to make your password more secured
4
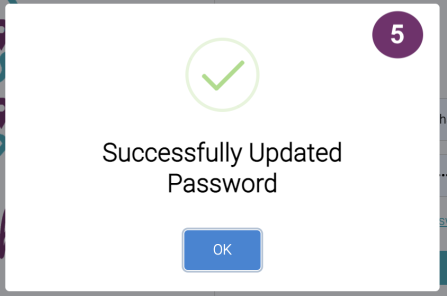
3
A pop should appear saying you have successfully updated your password.
Click OK to remove the pop and the login page will be displayed. Use your new password to login
Lesson 2 Company Details | Session 1 View Company Details
1
1
2
These are the count of enrolments under your company. Since you have just started, these numbers are expected to be zero.
3
This is the name of your assigned Business Development Manager, a upGrad GSP Personnel, who takes care of your whereabouts in upGrad GSP.
3
4
These is the count of the branches or locations that your company has.
5
The number below is your ID in the upGrad GSP System. Click the image to be navigated to the record pages where you can manage your team.
5
6
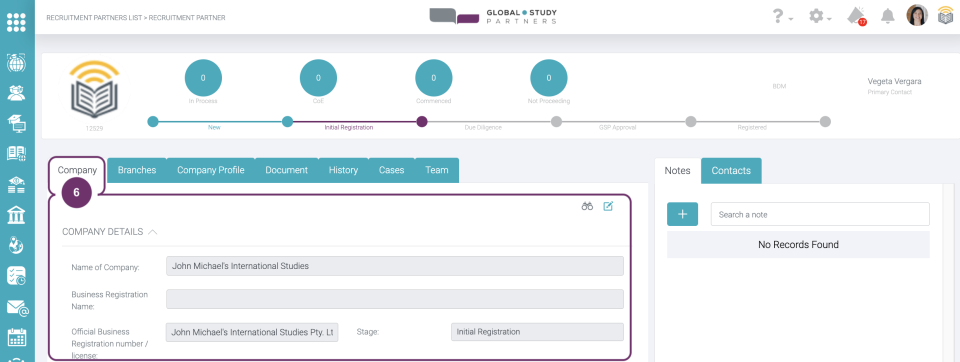
Company Tab displays your answers in the Become a Partner. You won’t be able to change any detail here.
7
Company Profile displays your answers in the Become a Partner as well. You won’t be able to edit anything here.
7
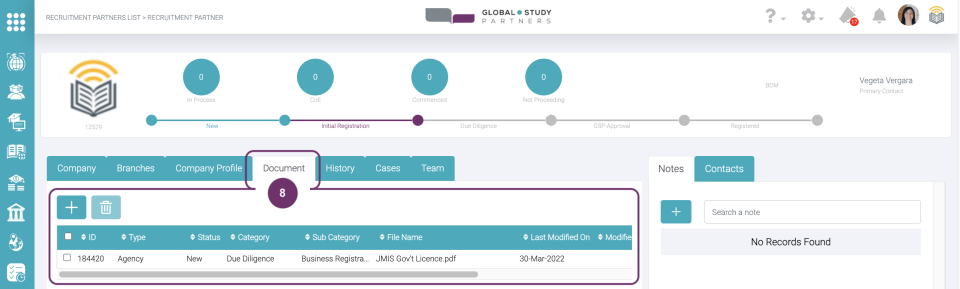
8
Documents you have submitted in the Become a Partner Wizard. You can add documents here based on what upGrad GSP will ask from you when they reach out to you. Learn more about managing documents.
9
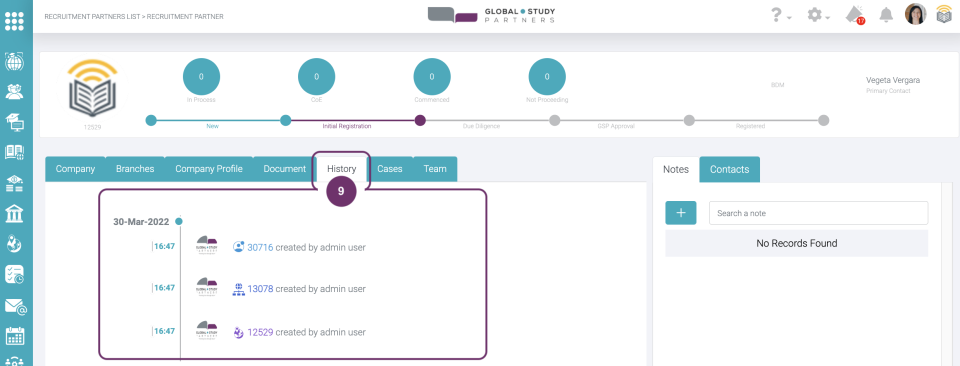
‘History’ lists all the happenings in your company or BAP Application like the progress in statuses.
9
10
Cases are generated on the admin side, you were only given permission to view the details.
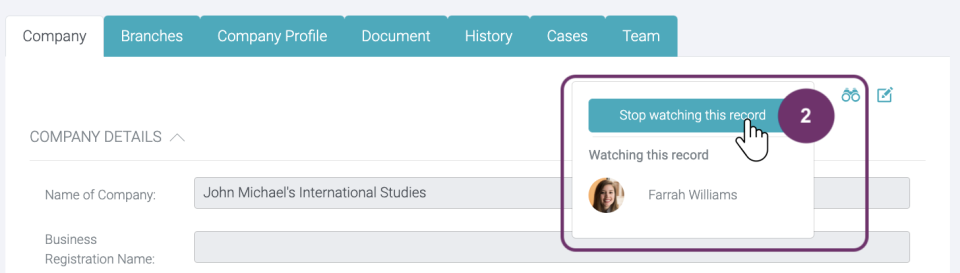
When you set a record page to “Watching”, you will receive notification whenever updates are made into the record by:
Notification in the header (bell icon)
Via email according to your set up in the Email Settings page in My Profile
Click Watch (binoculars icon) to see who else are watching this record and if you want to change the setting from “Watching” to “Not Watched”
When Watch is colored, it means you are currently watching updates in the record already.
2
If you do not want to be updated about this record, then click “Stop watching this record”
2
Lesson 3 Branches | Session 1 Add Branch
1
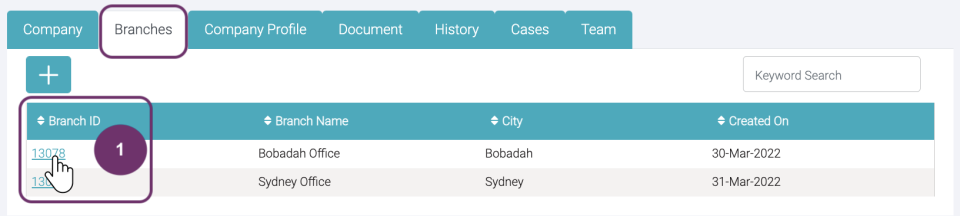
Branches are the locations of your offices. Click ‘Branch’ tab to manage your branches.
2
By default, the head office address you declared in the Become a Partner application is treated as one branch or the main branch. Thus, it is already listed here.
2
3
Keyword search becomes handy when you have lots of branches listed already.
4
Create Branch
Click the ‘Add Record’ icon to input details of the branch that you want to add.
4
5
In the ‘Branch Details’, you won’t be able to edit ‘RP ID’ and ‘RP Name’ fields as these remains your unique identity. You might accidentally change them so they were disabled from editing.
On the other hand, you can type any in your Branch Name, could be the city location or country, etc. as long as it is clear on your end which branch you are referring to.
6
The Branch Address is the specific address of your branch. It is required that you input the complete address.
6
7
Click ‘Cancel’ button if you do not want to save your changes.
Click ‘Create’ button if you want to proceed in adding the branch.
Image 7.1 This pop should be displayed when you have successfully added a new branch. This pop should be removed after 5 seconds or so.
8
You should be redirected to the record page of the new branch you just added so you can review the details. Click RP ID link to be redirected back to the Company Details Page.
8
9
When you go back to ‘Branches’, the new branch you added should be listed.
Lesson 3 Branches | Session 2 View Branch Details
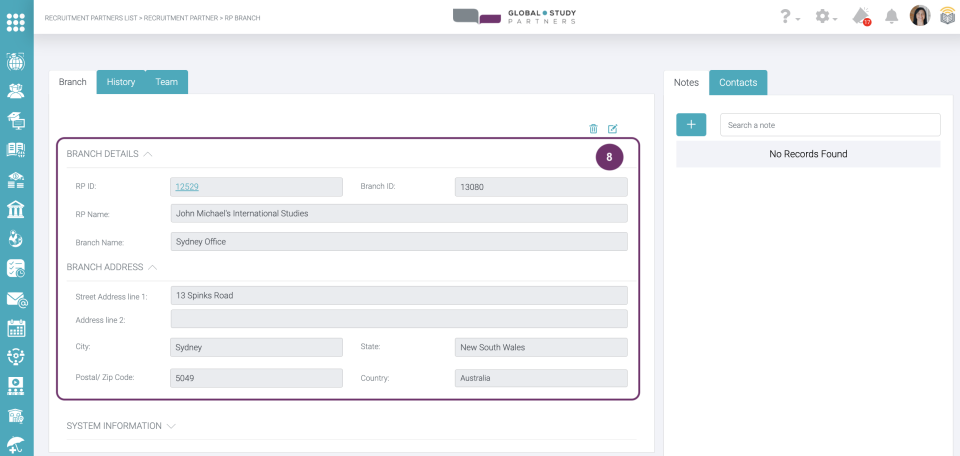
1
To view branch details, click the upGrad GSP ID link of the branch you want to view.
1
2
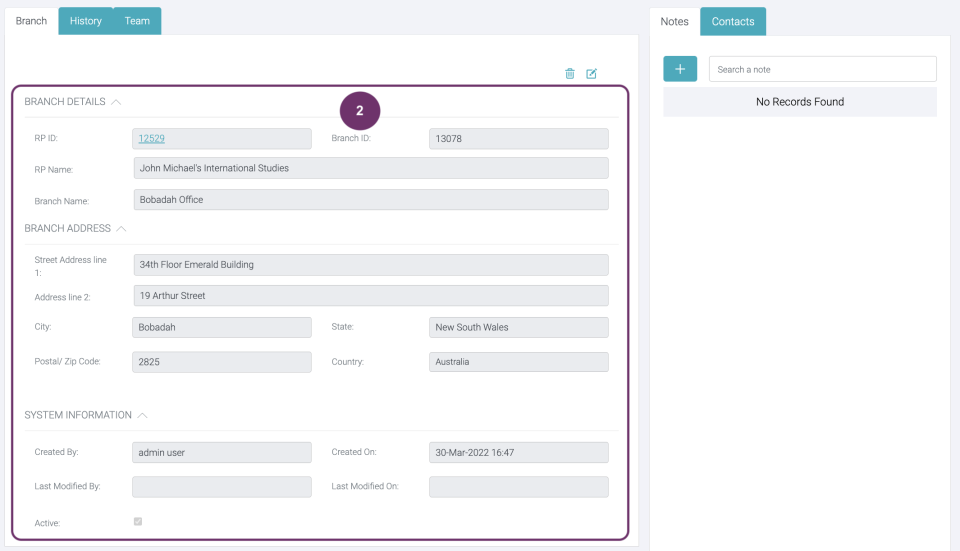
These are the details of your branch based on your inputs.
System Information section details on who and when the branch was created, and who and when it was lastly modified. Information you find here are system generated. Thus, you cannot update.
In case you want to update any of the details you made, click ‘Edit this Record’ icon.
1
2
At this point, when fields are in white, you can make the necessary updates. For instance the branch moved to a new location.
3
Click ‘Cancel‘ button if you do not want to save the changes.
Click ‘Update‘ button if you want to save your changes
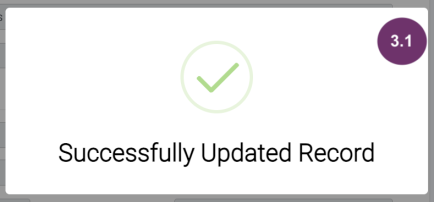
3.1 This pop should be displayed saying that you have successfully updated the branch details.
3
4
If the field you updated is displayed here, then the update should also reflect here immediately.
Lesson 3 Branches | Session 4 Delete Branch
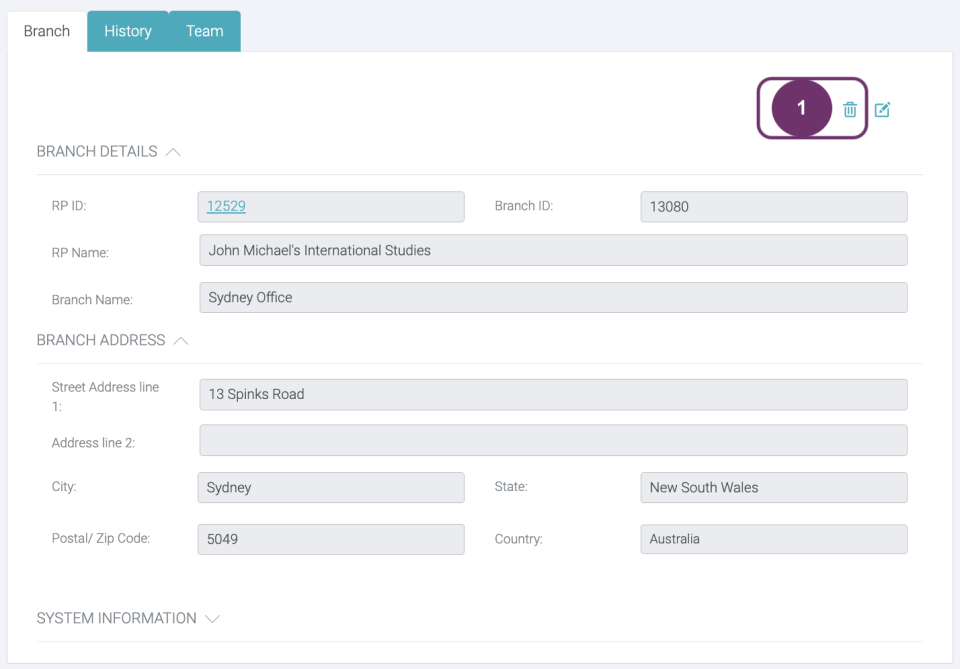
1
To delete a branch from the list, go to the branch record page and click ‘Delete this Record’ icon. Reasons for deleting a branch might be that the branch no longer function or has been merged to another branch nearby, etc.
1
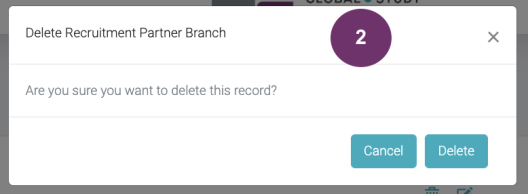
2
A pop should be displayed to confirm your action.
Click ‘Cancel‘ button if you do not want to delete the branch.
Click ‘Delete‘ button if you want to proceed in deleting the branch you have selected.
The close button ‘x’ at the top right is as good as ‘Cancel’
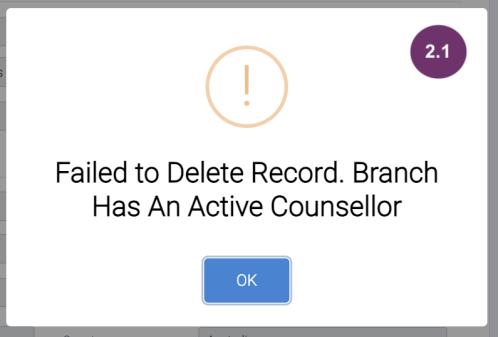
2.1 You cannot delete a Branch if it has at least one active Counsellor. You may either delete the active Counsellor linked to it or move the Counsellor to a different Branch so you can delete the Branch.
3
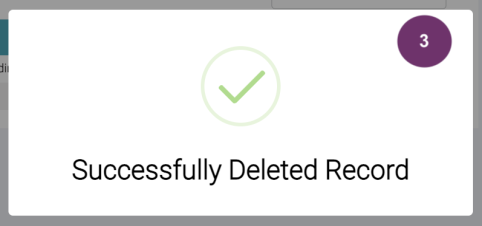
This pop should be displayed to confirm that the branch record has been deleted. This pop should be removed after 5 seconds or so.
3
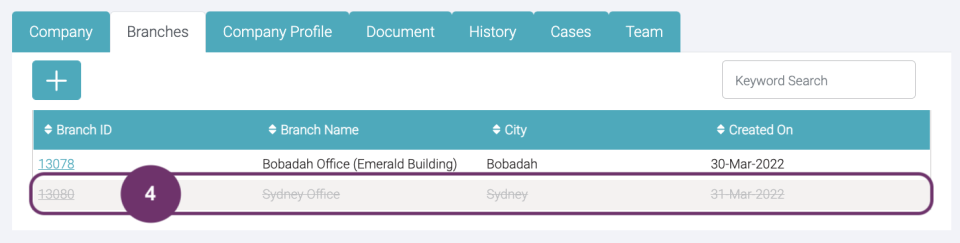
4
The branch record that you deleted should now look like this, greyed out and has a strikethrough. You can still click the Branch ID link to view the details but you can no longer update it.
Lesson 3 Branches | Session 5 Add Counsellor
1
When you are in the Branch Record, click Team Tab to see all the Counsellors listed for that particular Branch.
1
2
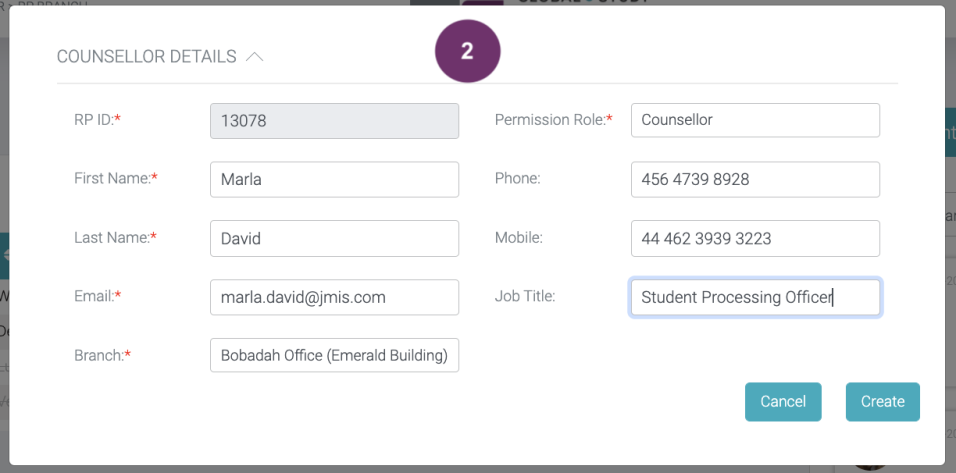
You should be able to input Counsellor details. Since you are already in the Branch Record upon navigating to this, then the only branch that will appear in the Branch drop down list is the Branch where you are adding the Counsellor. The next lesson tells us the access level or key features available and not depending on the Permission Role you will choose.
Click Create if you want to proceed on creating this Counsellor. Click Cancel if you do not want.
Lesson 3 Branches | Session 6 History
1
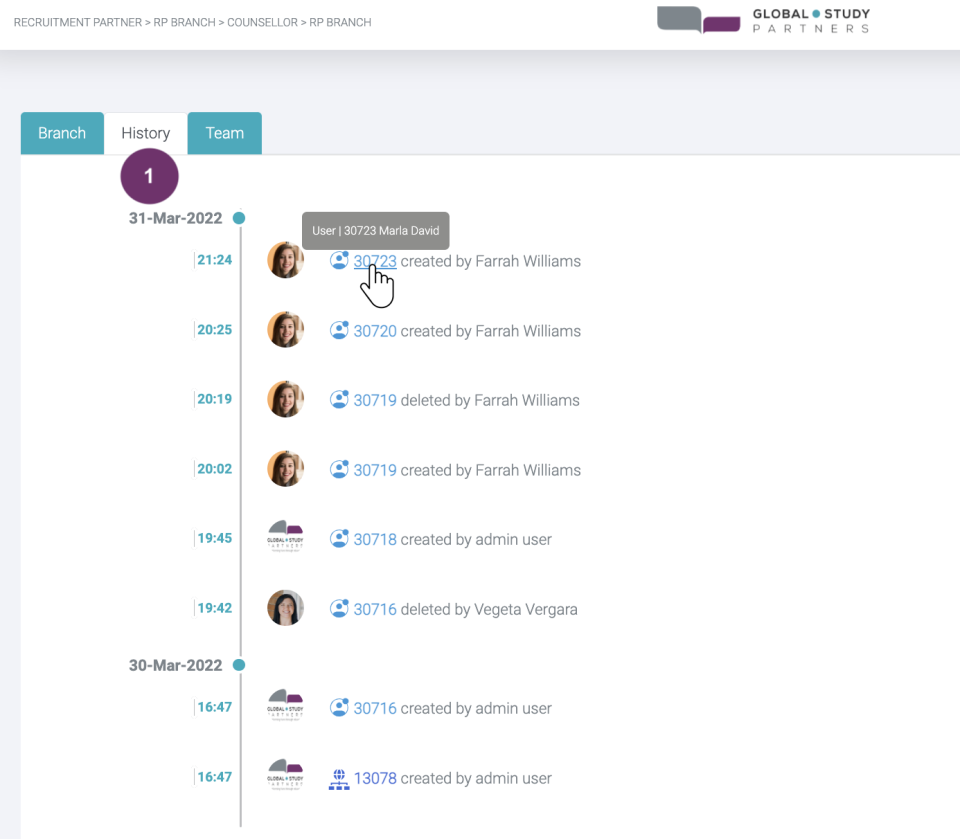
History is a full list of when the updates have been made and by whom. You may hover to the ID and click to see the record update, either deleted, new record or updated.
1
Lesson 4 Counsellors | Session 1 Add Counsellor
1
Under ‘Team’ tab, you can view all the counsellors. The the primary company contact you input in the Become a Partner Wizard was automatically added here. Click the User ID link to view the details of this counsellor.
1
Add Counsellor
1
Under ‘Team’ tab, you can add counsellors. Click ‘Add Record’ icon to input details.
2
Input details here. Branch field should give you a drop down list where you can choose which branch you would like to link the counsellor you are adding.
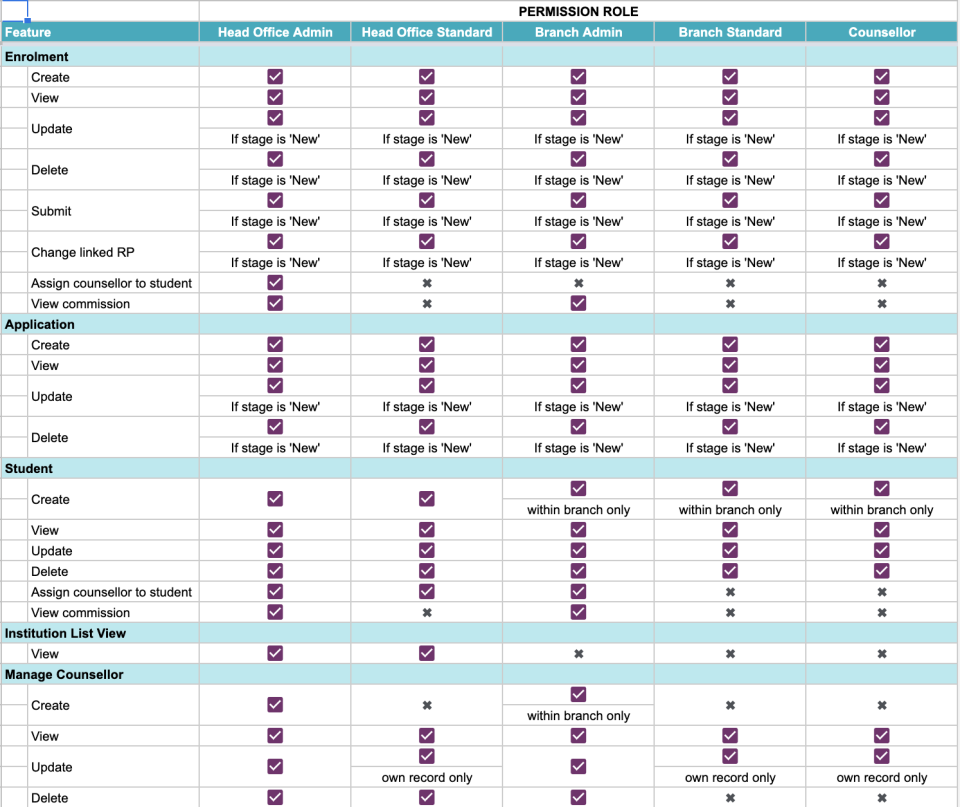
For the Permission Role, here is a guide of what can be accessed based on the permission role you will provide to your counsellors.
Examples based on the table above:
A Head Office Admin can create an enrolment record. However, he/ she can only update it if the enrolment’s stage is new. Once the enrolment’s stage move to another stage, then Head Office Admin cannot update it anymore.
Among the permission roles, only the Head Office Admin can assign a counsellor to a student when in enrolment page.
All permission roles can create student, it just depends on which branch they are allowed to.
Click ‘Create‘ button if you do not want to proceed on creating the Counsellor Record.
Click ‘Cancel‘ button if you no longer want to add the Counsellor Record.
2
3
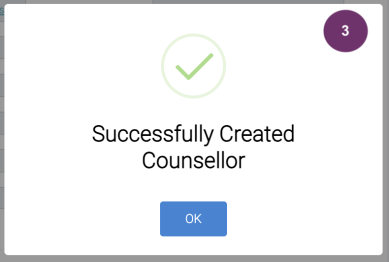
A pop should be displayed to confirm that the counsellor has been added. Click ‘OK’ button to remove the pop.
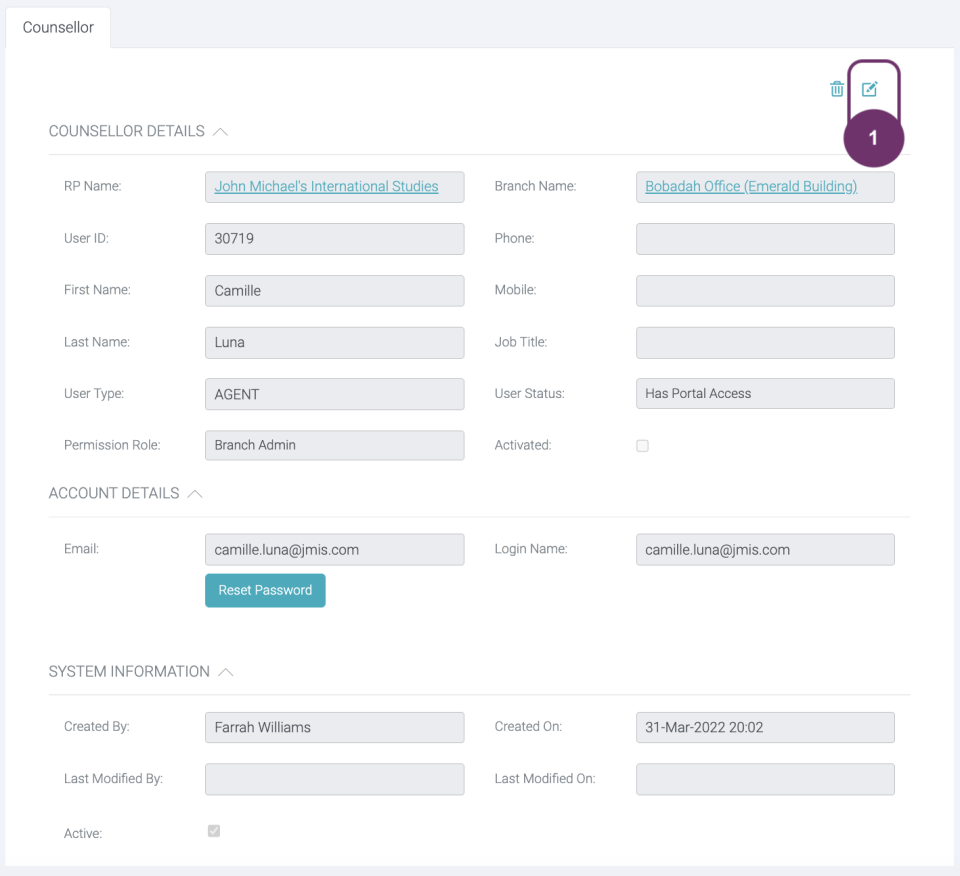
When you are in the Counsellor details page, click ‘Edit Record’ icon to make the fields editable.
Notice also that from this page, if you are a Recruitment Partner, you can easily navigate back to Recruitment Partner or Branch Name Details.
1
2
Fields become editable when text field is white. You cannot edit fields that are in grey.
Update Email/ Username
Important. At this point, you can change counsellor email. Thus, be careful to note that whatever email you replace here should be the username that the counsellor will use when logging back in to upGrad GSP. Don’t forget to tell the counsellor that you have changed his/her username.
You can also set the User Status to “No Portal Access” instead of deleting the Counsellor. This means that the Counsellor won’t be able to log in. But if you change it back to ‘Has Portal Access” then the Counsellor will be able to log back in.
3
Click ‘Cancel‘ button if you do not want to save your changes. Click ‘Update‘ button if you want to save your changes
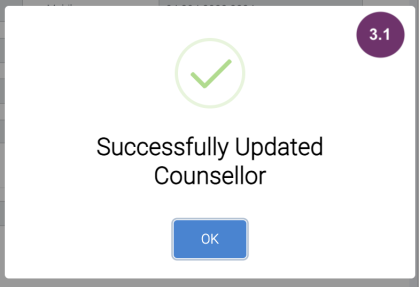
3.1 A pop should be displayed to confirm that the counsellor details has been updated. Click ‘OK’ button to remove the pop and see the counsellor details.
3
4
Changes should reflect immediately in the Counsellor Record.
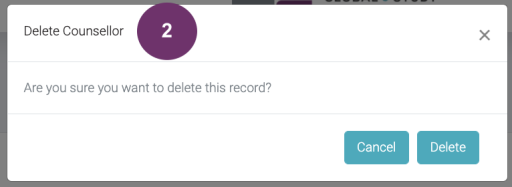
Delete ‘Counsellor’ record by going to the record view and click the ‘Delete Record’ icon.
2
Click ‘Delete‘ button if you want to proceed in deleting the counsellor record. Click ‘Cancel‘ button if you do not want to delete the record. The close button at the top right works the same as ‘Cancel’ button
2
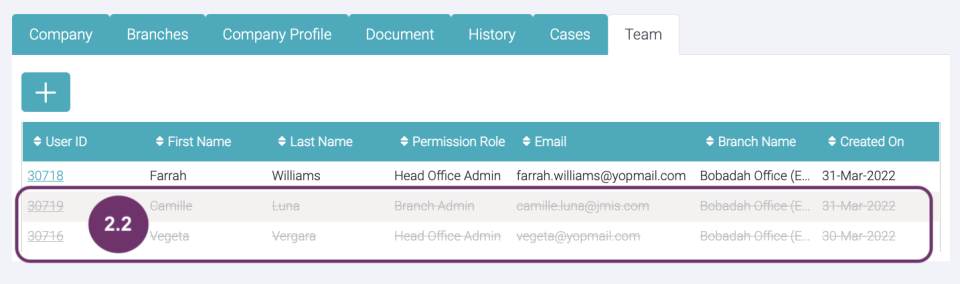
2.1 A pop should be displayed confirming that the counsellor has been successfully deleted. Click ‘OK’ button to remove the pop and view the list of counsellors.
2.2 Deleted counsellors would look like this., greyed out and strikethrough. You can still click the upGrad GSP ID link to view the details but you cannot update it anymore
You can send a reset password email to counsellors within your circle. In the counsellor record page, click ‘Reset Password’ button. The counsellor should receive an email from where he/she can reset password.
1
1.1 A confirmation pop should be displayed that an email has been sent to the counsellor. Counsellor can just follow the steps in the email on how to reset password.
Lesson 5 Notes and Contacts | Session 1 View Notes and Contacts
1
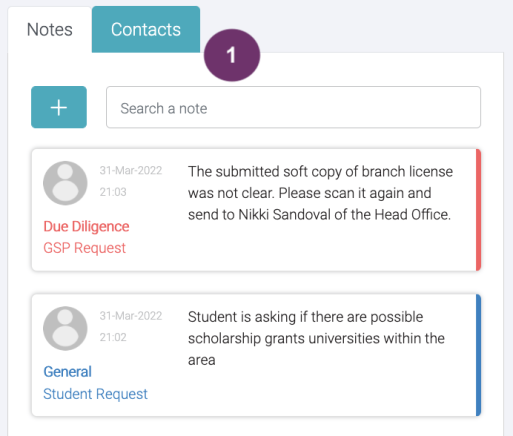
At the right side of you company details you shall see a section where you can keep Notes which may vary from the ff categories:
Agreement Follow-up
Application
Commission
Due Diligence
upGrad GSP Requests
Meeting
Renewal
RP Requests
Territory
Training
General
Each category may or may not have sub category. Using categories, it will be easier for the reader to know what the note is about.
Agreement Follow-up
Application
Documents
Lodgement
Student Request
Agent Request
BDM Request
Institution Request
Course Selection
General
Commission
Due Diligence
Agent Request
BDM Request
Approval
upGrad GSP Request
Ref Response
RP Contact
General
upGrad GSP Requests
Meeting
Renewal
RP Requests
Territory
Institution Request
Approval
Exclusion
upGrad GSP Requests
General
Training
Agent Request
BDM Request
Feedback
upGrad GSP Requests
General
General
Student Record
Agent Request
BDM Request
Institution Request
General
Click ‘Add Notes’ button to add notes. You can add as many notes as you like.
Click the note to view full details.
Learn more about Notes
2
At the right side of you company details you shall see a section where you can keep Contacts. The category for now is Primary.
Click ‘Add Contact’ button to “+ ” add contact. You can add as many contacts as you like.